Application Insights integrates with Log Analytics and sends telemetry to a common Log Analytics workspace. This setup provides full access to Log Analytics features, consolidates logs in one ___location, and allows for unified Azure role-based access control which eliminates the need for cross-app/workspace queries.
Enhanced capabilities include:
This article shows you how to create and configure Application Insights resources. Along with the Application Insights resource itself, you can add various configurations like setting the daily cap and pricing plan. You can also create availability tests, set up metric alerts, and automate the process using Azure Resource Manager.
Note
Data ingestion and retention for workspace-based Application Insights resources are billed through the Log Analytics workspace where the data is located. To learn more about billing, see Azure Monitor Logs pricing details.
Prerequisites
- An active Azure subscription.
- The necessary permissions to create resources.
Additional requirements
No additional requirements.
To access Application Insights Azure CLI commands, you first need to run:
az extension add -n application-insights
If you don't run the az extension add command, you see an error message that says: az : ERROR: az monitor: 'app-insights' is not in the 'az monitor' command group. See 'az monitor --help'.
You can deploy Bicep templates via the Azure CLI, Azure PowerShell, and in the Azure portal. Check the respective tabs for additional requirements.
You can deploy ARM templates via the Azure CLI, Azure PowerShell, and in the Azure portal. Check the respective tabs for additional requirements.
Create an Application Insights resource
Note
If you don't connect to an existing Log Analytics workspace during resource creation, a new Log Analytics resource is created automatically along with your Application Insights resource.
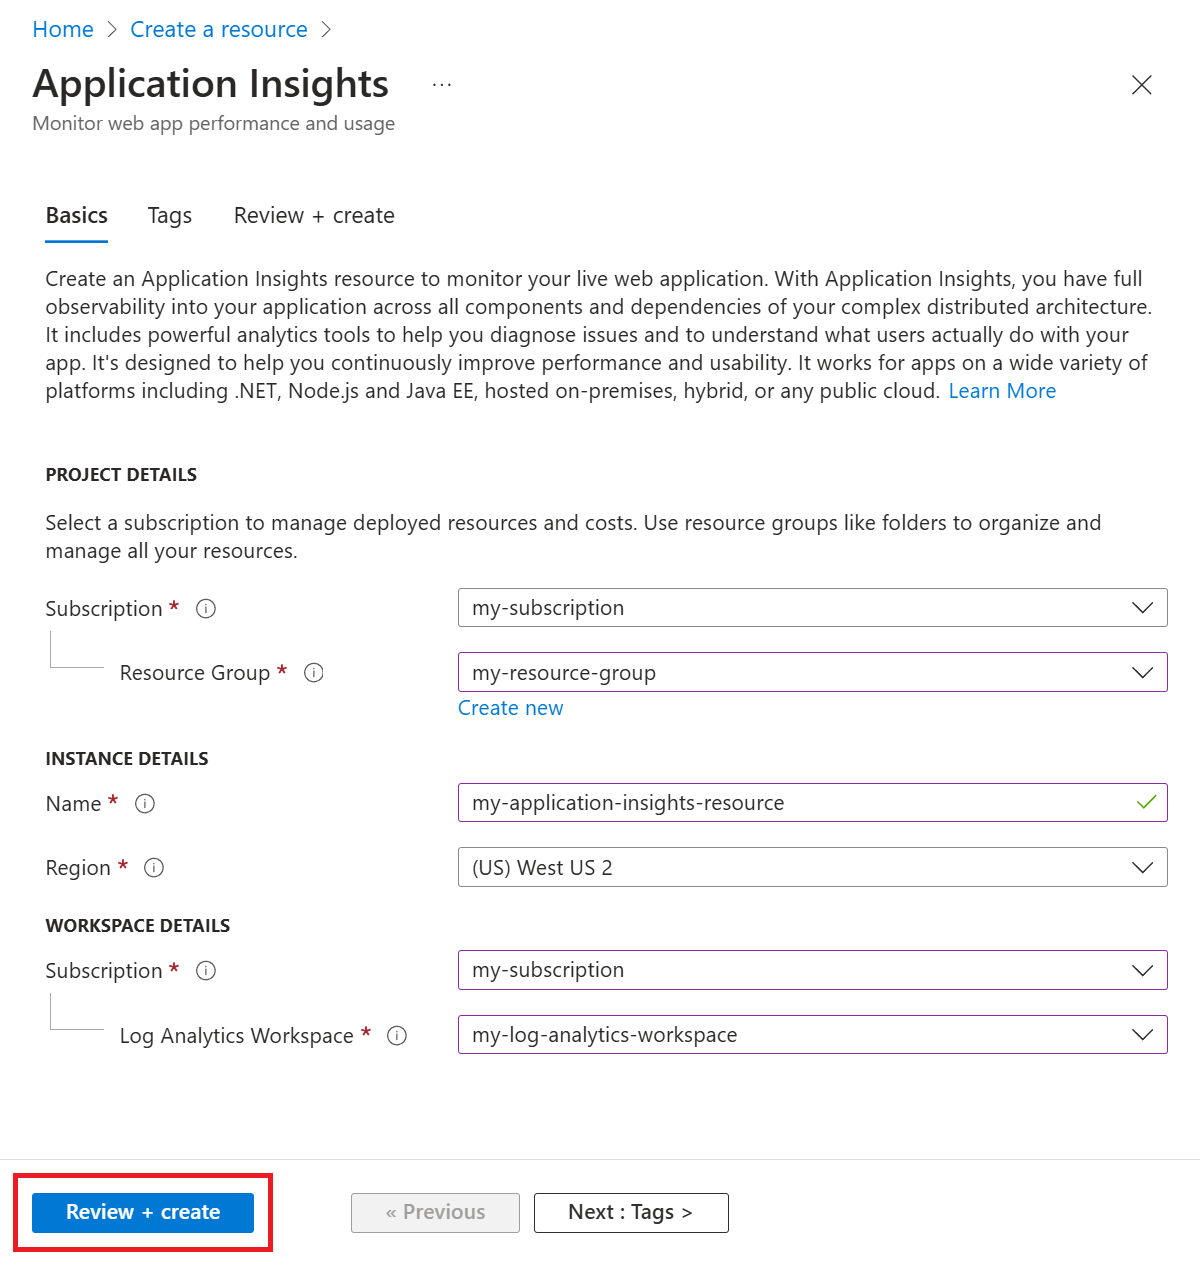
- Sign in to the Azure portal.
- Select Create a resource.
- Open the category Monitoring & Diagnostics, then select Application Insights.
- Enter all relevant information, then Review + create your Application Insights resource.
After creating your resource, you can find the corresponding workspace information in the Application Insights Overview pane.
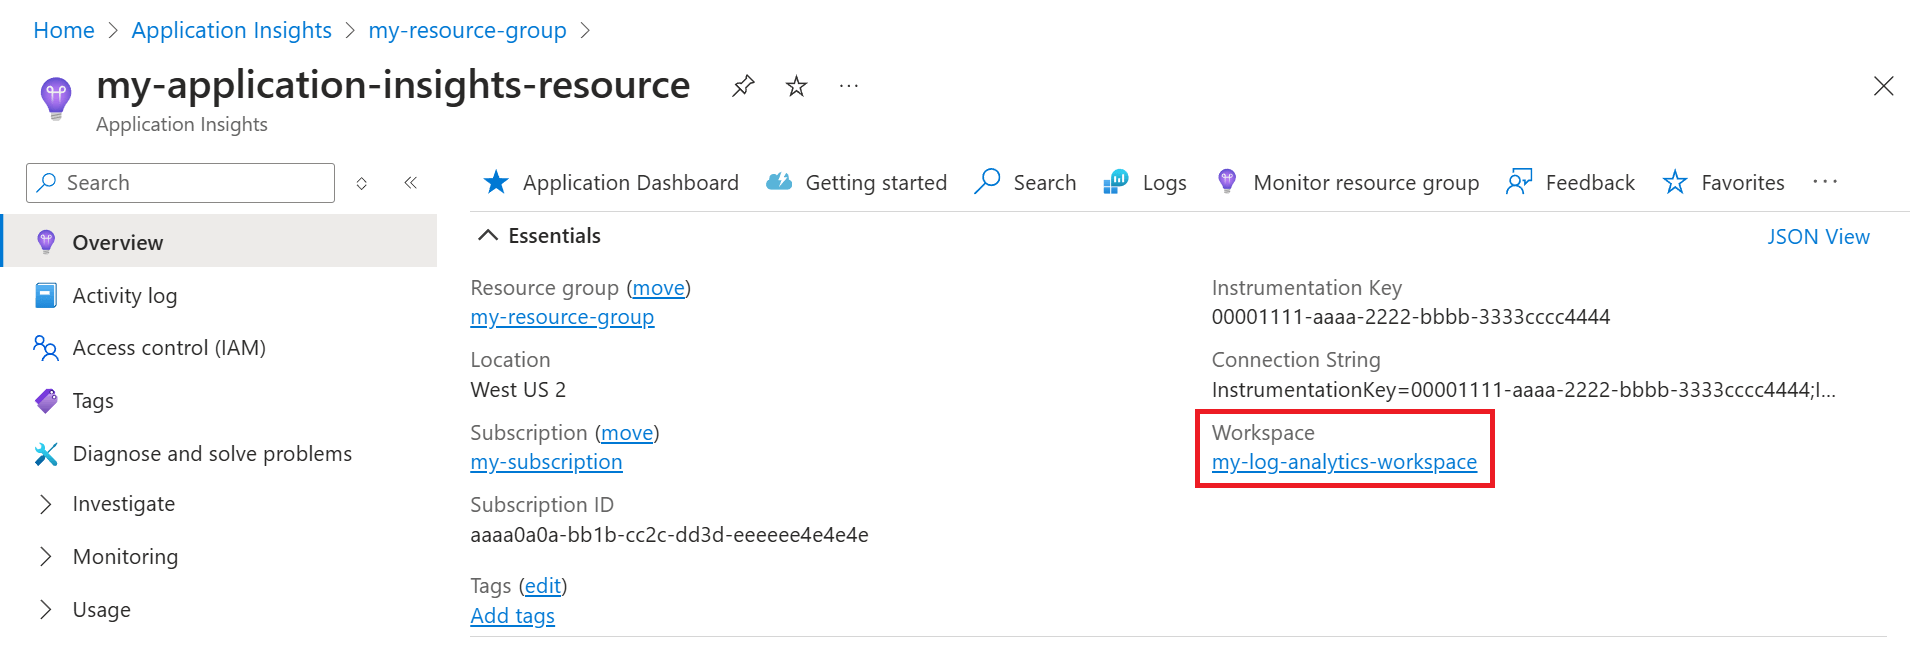
Select the blue link text to go to the associated Log Analytics workspace where you can take advantage of the new unified workspace query environment.
Note
We still provide full backward compatibility for your Application Insights classic resource queries, workbooks, and log-based alerts. To query or view the new workspace-based table structure or schema, you must first go to your Log Analytics workspace. Select Logs (Analytics) in the Application Insights panes for access to the classic Application Insights query experience.
The following Azure CLI example uses the az monitor app-insights component create command.
# Set variables
resourceGroupName="<ResourceGroupName>"
resourceName="<ResourceName>"
azureRegion="<AzureRegion>"
workspaceName="<WorkspaceName>"

# Get the subscription ID from the current Azure CLI context
subscriptionId=$(az account show --query id --output tsv)

# Build the full resource ID for the Log Analytics workspace
workspaceResourceId="/subscriptions/$subscriptionId/resourceGroups/$resourceGroupName/providers/Microsoft.OperationalInsights/workspaces/$workspaceName"

# Create a workspace-based Application Insights resource
az monitor app-insights component create \
  --app "$resourceName" \
  --___location "$azureRegion" \
  --resource-group "$resourceGroupName" \
  --kind web \
  --application-type web \
  --workspace "$workspaceResourceId"
Note
Azure CLI commands use the Azure Resource Manager endpoint from the current CLI context, so management.azure.com doesn't need to be specified in the command syntax.
The following Azure PowerShell example uses the New-AzApplicationInsights cmdlet.
# Set variables
$resourceGroupName = "<ResourceGroupName>"
$resourceName = "<ResourceName>"
$azureRegion = "<AzureRegion>"
$workspaceName = "<WorkspaceName>"

# Get the subscription ID from the current Azure PowerShell context
$subscriptionId = (Get-AzContext).Subscription.Id

# Build the full resource ID for the Log Analytics workspace
$workspaceResourceId = "/subscriptions/$subscriptionId/resourceGroups/$resourceGroupName/providers/Microsoft.OperationalInsights/workspaces/$workspaceName"

# Define the parameters for the Application Insights resource
$newAzApplicationInsightsParams = @{
    ResourceGroupName   = $resourceGroupName
    Name                = $resourceName
    Location            = $azureRegion
    Kind                = "web"
    ApplicationType     = "web"
    WorkspaceResourceId = $workspaceResourceId
}

# Create a workspace-based Application Insights resource
New-AzApplicationInsights @newAzApplicationInsightsParams
Note
Azure PowerShell cmdlets use the Azure Resource Manager endpoint from the current Az context, so management.azure.com doesn’t need to be specified in the cmdlet syntax.
The following REST example uses the Components - Create Or Update REST API operation.
PUT https://management.azure.com/subscriptions/{SubscriptionId}/resourceGroups/{ResourceGroupName}/providers/Microsoft.Insights/components/{ResourceName}?api-version=2020-02-02
Authorization: Bearer {AccessToken}
Content-Type: application/json

{
  "kind": "web",
  "___location": "<AzureRegion>",
  "properties": {
    "Application_Type": "web",
    "WorkspaceResourceId": "/subscriptions/<SubscriptionId>/resourceGroups/<ResourceGroupName>/providers/Microsoft.OperationalInsights/workspaces/<WorkspaceName>"
  }
}
The following Bicep example uses the Microsoft.Insights/components resource type.
param subscriptionId string = '<SubscriptionId>'
param resourceGroupName string = '<ResourceGroupName>'
param resourceName string = '<ResourceName>'
param azureRegion string = '<AzureRegion>'
param workspaceName string = '<WorkspaceName>'

var workspaceResourceId = '/subscriptions/${subscriptionId}/resourceGroups/${resourceGroupName}/providers/Microsoft.OperationalInsights/workspaces/${workspaceName}'

resource applicationInsightsComponent 'Microsoft.Insights/components@2020-02-02' = {
  name: resourceName
  ___location: azureRegion
  kind: 'web'
  properties: {
    Application_Type: 'web'
    WorkspaceResourceId: workspaceResourceId
  }
}
The following ARM (JSON) example uses the Microsoft.Insights/components resource type.
{
  "$schema": "https://schema.management.azure.com/schemas/2019-04-01/deploymentTemplate.json#",
  "contentVersion": "1.0.0.0",
  "parameters": {
    "subscriptionId": {
      "type": "string",
      "defaultValue": "<SubscriptionId>"
    },
    "resourceGroupName": {
      "type": "string",
      "defaultValue": "<ResourceGroupName>"
    },
    "resourceName": {
      "type": "string",
      "defaultValue": "<ResourceName>"
    },
    "azureRegion": {
      "type": "string",
      "defaultValue": "<AzureRegion>"
    },
    "workspaceName": {
      "type": "string",
      "defaultValue": "<WorkspaceName>"
    }
  },
  "variables": {
    "workspaceResourceId": "[format('/subscriptions/{0}/resourceGroups/{1}/providers/Microsoft.OperationalInsights/workspaces/{2}', parameters('subscriptionId'), parameters('resourceGroupName'), parameters('workspaceName'))]"
  },
  "resources": [
    {
      "type": "Microsoft.Insights/components",
      "apiVersion": "2020-02-02",
      "name": "[parameters('resourceName')]",
      "___location": "[parameters('azureRegion')]",
      "kind": "web",
      "properties": {
        "Application_Type": "web",
        "WorkspaceResourceId": "[variables('workspaceResourceId')]"
      }
    }
  ]
}
After creating an Application Insights resource, you configure monitoring.
Get the connection string
The connection string identifies the resource that you want to associate your telemetry data with. You can also use it to modify the endpoints your resource uses as a destination for your telemetry. You must copy the connection string and add it to your application's code or to an environment variable.
To get the connection string of your Application Insights resource:
- Open your Application Insights resource in the Azure portal.
- On the Overview pane in the Essentials section, look for Connection string.
- If you hover over the connection string, an icon appears which allows you to copy it to your clipboard.
The following Azure CLI example uses the az monitor app-insights component show command.
# Set variables
resourceGroupName="<ResourceGroupName>"
resourceName="<ResourceName>"

# Retrieve the Application Insights component
az monitor app-insights component show \
  --resource-group "$resourceGroupName" \
  --app "$resourceName"
Look for the connectionString field in the JSON response.
The following Azure PowerShell example uses the Get-AzApplicationInsights cmdlet.
# Set variables
$resourceGroupName = "<ResourceGroupName>"
$resourceName = "<ResourceName>"

# Define parameters for Get-AzApplicationInsights
$getAzApplicationInsightsParams = @{
    ResourceGroupName = $resourceGroupName
    Name              = $resourceName
}

# Retrieve the Application Insights component
Get-AzApplicationInsights @getAzApplicationInsightsParams
Look for the ConnectionString property in the output.
The following REST example uses the Components - Get REST API operation.
GET https://management.azure.com/subscriptions/{SubscriptionId}/resourceGroups/{ResourceGroupName}/providers/Microsoft.Insights/components/{ResourceName}?api-version=2020-02-02
Authorization: Bearer {AccessToken}
Look for the properties.connectionString field in the JSON response.
Not applicable to Bicep templates.
Not applicable to ARM templates.
Application monitoring with OpenTelemetry
For application monitoring with OpenTelemetry, install the appropriate Azure Monitor OpenTelemetry Distro and point the connection string to your newly created resource.
For information on how to set up application monitoring with OpenTelemetry, see the following language-specific documentation:
Automatic instrumentation
For monitoring services like Azure Functions and Azure App Service, you can first create your Application Insights resource, then point to it when you enable monitoring. Alternatively, you can create a new Application Insights resource during the enablement process.
Modify the associated workspace
After creating an Application Insights resource, you can modify the associated Log Analytics workspace.
Important
REST calls, ARM templates, and Bicep templates use create-or-update (PUT) semantics. When you update an Application Insights component by using these methods, include any required properties that you want to keep. Properties that aren't included might be reset or removed.
In your Application Insights resource, select Properties > Change workspace > Log Analytics Workspaces.
The following Azure CLI example uses the az monitor app-insights component update command.
# Set variables
resourceGroupName="<ResourceGroupName>"
resourceName="<ResourceName>"
workspaceName="<WorkspaceName>"

# Get the subscription ID from the current Azure CLI context
subscriptionId=$(az account show --query id --output tsv)

# Build the full resource ID for the Log Analytics workspace
workspaceResourceId="/subscriptions/$subscriptionId/resourceGroups/$resourceGroupName/providers/Microsoft.OperationalInsights/workspaces/$workspaceName"

# Update a workspace-based Application Insights resource
az monitor app-insights component update \
  --resource-group "$resourceGroupName" \
  --app "$resourceName" \
  --workspace "$workspaceResourceId"
The following Azure PowerShell example uses the Update-AzApplicationInsights cmdlet.
# Set variables
$resourceGroupName = "<ResourceGroupName>"
$resourceName = "<ResourceName>"
$workspaceName = "<WorkspaceName>"

# Get the subscription ID from the current Azure PowerShell context
$subscriptionId = (Get-AzContext).Subscription.Id

# Build the full resource ID for the Log Analytics workspace
$workspaceResourceId = "/subscriptions/$subscriptionId/resourceGroups/$resourceGroupName/providers/Microsoft.OperationalInsights/workspaces/$workspaceName"

# Define the parameters for the Application Insights resource
$updateAzApplicationInsightsParams = @{
    ResourceGroupName   = $resourceGroupName
    Name                = $resourceName
    WorkspaceResourceId = $workspaceResourceId
}

# Update a workspace-based Application Insights resource
Update-AzApplicationInsights @updateAzApplicationInsightsParams
The following REST example uses the Components - Create Or Update REST API operation.
PUT https://management.azure.com/subscriptions/{SubscriptionId}/resourceGroups/{ResourceGroupName}/providers/Microsoft.Insights/components/{ResourceName}?api-version=2020-02-02
Authorization: Bearer {AccessToken}
Content-Type: application/json

{
  "___location": "<AzureRegion>",
  "kind": "web",
  "properties": {
    "Application_Type": "web",
    "WorkspaceResourceId": "/subscriptions/<SubscriptionId>/resourceGroups/<ResourceGroupName>/providers/Microsoft.OperationalInsights/workspaces/<WorkspaceName>"
  }
}
The following Bicep example uses the Microsoft.Insights components resource type.
param subscriptionId string = '<SubscriptionId>'
param resourceGroupName string = '<ResourceGroupName>'
param resourceName string = '<ResourceName>'
param azureRegion string = '<AzureRegion>'
param workspaceName string = '<WorkspaceName>'

var workspaceResourceId = '/subscriptions/${subscriptionId}/resourceGroups/${resourceGroupName}/providers/Microsoft.OperationalInsights/workspaces/${workspaceName}'

resource applicationInsightsComponent 'Microsoft.Insights/components@2020-02-02' = {
  name: resourceName
  ___location: azureRegion
  kind: 'web'
  properties: {
    Application_Type: 'web'
    WorkspaceResourceId: workspaceResourceId
  }
}
The following ARM (JSON) example uses the Microsoft.Insights components resource type.
{
  "$schema": "https://schema.management.azure.com/schemas/2019-04-01/deploymentTemplate.json#",
  "contentVersion": "1.0.0.0",
  "parameters": {
    "subscriptionId": {
      "type": "string",
      "defaultValue": "<SubscriptionId>"
    },
    "resourceGroupName": {
      "type": "string",
      "defaultValue": "<ResourceGroupName>"
    },
    "resourceName": {
      "type": "string",
      "defaultValue": "<ResourceName>"
    },
    "azureRegion": {
      "type": "string",
      "defaultValue": "<AzureRegion>"
    },
    "workspaceName": {
      "type": "string",
      "defaultValue": "<WorkspaceName>"
    }
  },
  "variables": {
    "workspaceResourceId": "[format('/subscriptions/{0}/resourceGroups/{1}/providers/Microsoft.OperationalInsights/workspaces/{2}', parameters('subscriptionId'), parameters('resourceGroupName'), parameters('workspaceName'))]"
  },
  "resources": [
    {
      "type": "Microsoft.Insights/components",
      "apiVersion": "2020-02-02",
      "name": "[parameters('resourceName')]",
      "___location": "[parameters('azureRegion')]",
      "kind": "web",
      "properties": {
        "Application_Type": "web",
        "WorkspaceResourceId": "[variables('workspaceResourceId')]"
      }
    }
  ]
}
Export telemetry
The legacy continuous export functionality isn't supported for workspace-based resources. Instead, use Diagnostic settings.
Note
Diagnostic settings export might increase costs. For more information, see Export telemetry from Application Insights.
For pricing information for this feature, see the Azure Monitor pricing page. Before the start of billing, notifications are sent. If you continue to use telemetry export after the notice period, you'll be billed at the applicable rate.
In your Application Insights resource, select Diagnostic settings > Add diagnostic setting.
You can select all tables or a subset of tables to archive to a storage account. You can also stream to an event hub.
The following Azure CLI example uses the az monitor diagnostic-settings create command. It creates a diagnostic setting that sends logs and metrics from an Application Insights resource to a storage account.
# Set variables
resourceGroupName="<ResourceGroupName>"
resourceName="<ResourceName>"
storageAccountName="<StorageAccountName>"
diagnosticSettingName="<DiagnosticSettingName>"

# Get the subscription ID from the current Azure CLI context
subscriptionId=$(az account show --query id --output tsv)

# Build the full resource ID for the Application Insights component
resourceId="/subscriptions/$subscriptionId/resourceGroups/$resourceGroupName/providers/Microsoft.Insights/components/$resourceName"

# Build the full resource ID for the storage account
storageAccountId="/subscriptions/$subscriptionId/resourceGroups/$resourceGroupName/providers/Microsoft.Storage/storageAccounts/$storageAccountName"

# Create the diagnostic setting
az monitor diagnostic-settings create \
  --name "$diagnosticSettingName" \
  --resource "$resourceId" \
  --storage-account "$storageAccountId" \
  --logs '[{"category":"AppRequests","enabled":true}]' \
  --metrics '[{"category":"AllMetrics","enabled":true}]'
The following Azure PowerShell example uses the New-AzDiagnosticSetting cmdlet. It creates a diagnostic setting that sends logs and metrics from an Application Insights resource to a storage account.
# Set variables
$resourceGroupName = "<ResourceGroupName>"
$resourceName = "<ResourceName>"
$storageAccountName = "<StorageAccountName>"
$diagnosticSettingName = "<DiagnosticSettingName>"

# Get the subscription ID from the current Azure PowerShell context
$subscriptionId = (Get-AzContext).Subscription.Id

# Build the full resource ID for the Application Insights component
$resourceId = "/subscriptions/$subscriptionId/resourceGroups/$resourceGroupName/providers/Microsoft.Insights/components/$resourceName"

# Build the full resource ID for the storage account
$storageAccountId = "/subscriptions/$subscriptionId/resourceGroups/$resourceGroupName/providers/Microsoft.Storage/storageAccounts/$storageAccountName"

# Create log and metric settings objects
$log = New-AzDiagnosticSettingLogSettingsObject `
  -Category 'AppRequests' `
  -Enabled $true

$metric = New-AzDiagnosticSettingMetricSettingsObject `
  -Category 'AllMetrics' `
  -Enabled $true

# Define parameters for New-AzDiagnosticSetting
$newAzDiagnosticSettingParams = @{
    Name             = $diagnosticSettingName
    ResourceId       = $resourceId
    StorageAccountId = $storageAccountId
    Log              = @($log)
    Metric           = @($metric)
}

# Create the diagnostic setting
New-AzDiagnosticSetting @newAzDiagnosticSettingParams
The following REST example uses the Diagnostic Settings - Create Or Update REST API operation. It creates a diagnostic setting that sends logs and metrics from an Application Insights resource to a storage account.
PUT https://management.azure.com/subscriptions/{SubscriptionId}/resourceGroups/{ResourceGroupName}/providers/Microsoft.Insights/components/{ResourceName}/providers/Microsoft.Insights/diagnosticSettings/{DiagnosticSettingName}?api-version=2021-05-01-preview
Authorization: Bearer {AccessToken}
Content-Type: application/json

{
  "properties": {
    "storageAccountId": "/subscriptions/<SubscriptionId>/resourceGroups/<ResourceGroupName>/providers/Microsoft.Storage/storageAccounts/<StorageAccountName>",
    "logs": [
      {
        "category": "AppRequests",
        "enabled": true
      }
    ],
    "metrics": [
      {
        "category": "AllMetrics",
        "enabled": true
      }
    ]
  }
}
The following Bicep example uses the Microsoft.Insights diagnosticSettings resource type. It creates a diagnostic setting that sends logs and metrics from an Application Insights resource to a storage account.
param subscriptionId string = '<SubscriptionId>'
param resourceGroupName string = '<ResourceGroupName>'
param resourceName string = '<ResourceName>'
param storageAccountName string = '<StorageAccountName>'
param diagnosticSettingName string = '<DiagnosticSettingName>'

resource applicationInsightsComponent 'Microsoft.Insights/components@2020-02-02' existing = {
  name: resourceName
}

var storageAccountId = '/subscriptions/${subscriptionId}/resourceGroups/${resourceGroupName}/providers/Microsoft.Storage/storageAccounts/${storageAccountName}'

resource diagnosticSetting 'Microsoft.Insights/diagnosticSettings@2021-05-01-preview' = {
  name: diagnosticSettingName
  scope: applicationInsightsComponent
  properties: {
    storageAccountId: storageAccountId
    logs: [
      {
        category: 'AppRequests'
        enabled: true
      }
    ]
    metrics: [
      {
        category: 'AllMetrics'
        enabled: true
      }
    ]
  }
}
The following ARM template example uses the Microsoft.Insights diagnosticSettings resource type. It creates a diagnostic setting that sends logs and metrics from an Application Insights resource to a storage account.
{
  "$schema": "https://schema.management.azure.com/schemas/2019-04-01/deploymentTemplate.json#",
  "contentVersion": "1.0.0.0",
  "parameters": {
    "subscriptionId": {
      "type": "string",
      "defaultValue": "<SubscriptionId>"
    },
    "resourceGroupName": {
      "type": "string",
      "defaultValue": "<ResourceGroupName>"
    },
    "resourceName": {
      "type": "string",
      "defaultValue": "<ResourceName>"
    },
    "storageAccountName": {
      "type": "string",
      "defaultValue": "<StorageAccountName>"
    },
    "diagnosticSettingName": {
      "type": "string",
      "defaultValue": "<DiagnosticSettingName>"
    }
  },
  "variables": {
    "storageAccountId": "[format('/subscriptions/{0}/resourceGroups/{1}/providers/Microsoft.Storage/storageAccounts/{2}', parameters('subscriptionId'), parameters('resourceGroupName'), parameters('storageAccountName'))]"
  },
  "resources": [
    {
      "type": "Microsoft.Insights/components/providers/diagnosticSettings",
      "apiVersion": "2021-05-01-preview",
      "name": "[format('{0}/Microsoft.Insights/{1}', parameters('resourceName'), parameters('diagnosticSettingName'))]",
      "properties": {
        "storageAccountId": "[variables('storageAccountId')]",
        "logs": [
          {
            "category": "AppRequests",
            "enabled": true
          }
        ],
        "metrics": [
          {
            "category": "AllMetrics",
            "enabled": true
          }
        ]
      }
    }
  ]
}
Set the data retention
The following Bicep example uses the Microsoft.OperationalInsights workspaces resource type. It sets the data retention period for the associated Log Analytics workspace.
param workspaceName string = '<WorkspaceName>'
param azureRegion string = '<AzureRegion>'
param retentionInDays int = <RetentionInDays>

resource logAnalyticsWorkspace 'Microsoft.OperationalInsights/workspaces@2025-07-01' = {
  name: workspaceName
  ___location: azureRegion
  properties: {
    retentionInDays: retentionInDays
  }
}
The following ARM (JSON) example uses the Microsoft.OperationalInsights workspaces resource type. It sets the data retention period for the associated Log Analytics workspace.
{
  "$schema": "https://schema.management.azure.com/schemas/2019-04-01/deploymentTemplate.json#",
  "contentVersion": "1.0.0.0",
  "parameters": {
    "workspaceName": {
      "type": "string",
      "defaultValue": "<WorkspaceName>"
    },
    "azureRegion": {
      "type": "string",
      "defaultValue": "<AzureRegion>"
    },
    "retentionInDays": {
      "type": "int",
      "defaultValue": <RetentionInDays>
    }
  },
  "resources": [
    {
      "type": "Microsoft.OperationalInsights/workspaces",
      "apiVersion": "2025-07-01",
      "name": "[parameters('workspaceName')]",
      "___location": "[parameters('azureRegion')]",
      "properties": {
        "retentionInDays": "[parameters('retentionInDays')]"
      }
    }
  ]
}
Set the daily cap
The daily cap must be set independently for both Application Insights and the underlying Log Analytics workspace. The effective daily cap is the minimum of the two settings.
Note
Currently, Azure doesn't provide a way to set the daily cap for Application Insights via the Azure CLI.
Log Analytics:
The following Azure CLI example uses the az monitor log-analytics workspace update command.
# Set variables
resourceGroupName="<ResourceGroupName>"
workspaceName="<WorkspaceName>"
dailyCapInGb="<DailyCapInGb>"

# Update the daily cap for the Log Analytics workspace
az monitor log-analytics workspace update \
  --resource-group "$resourceGroupName" \
  --workspace-name "$workspaceName" \
  --set workspaceCapping.dailyQuotaGb=$dailyCapInGb
The following Azure PowerShell examples use the Set-AzApplicationInsightsDailyCap and Set-AzOperationalInsightsWorkspace cmdlets.
Application Insights:
The following Azure PowerShell examples use the Set-AzApplicationInsightsDailyCap cmdlet.
# Set variables
$resourceGroupName = "<ResourceGroupName>"
$resourceName = "<ResourceName>"
$dailyCapInGb = "<DailyCapInGb>"

# Define the parameters for the daily cap
$setAzApplicationInsightsDailyCapParams = @{
    ResourceGroupName = $resourceGroupName
    Name              = $resourceName
    DailyCapGB        = $dailyCapInGb
}

# Set the daily cap for the Application Insights resource
Set-AzApplicationInsightsDailyCap @setAzApplicationInsightsDailyCapParams
Log Analytics:
The following Azure PowerShell examples use the Set-AzOperationalInsightsWorkspace cmdlet.
# Set variables
$resourceGroupName = "<ResourceGroupName>"
$workspaceName = "<WorkspaceName>"
$dailyCapInGb = "<DailyCapInGb>"

# Define the parameters for the daily cap
$setAzOperationalInsightsWorkspaceParams = @{
    ResourceGroupName = $resourceGroupName
    Name              = $workspaceName
    DailyQuotaGb      = $dailyCapInGb
}

# Set the daily cap for the Log Analytics workspace
Set-AzOperationalInsightsWorkspace @setAzOperationalInsightsWorkspaceParams
Note
Currently, Azure doesn't provide a way to set the daily cap for Application Insights via the REST API.
Log Analytics:
The following REST example uses the Workspaces - Update REST API operation.
PATCH https://management.azure.com/subscriptions/{SubscriptionId}/resourceGroups/{ResourceGroupName}/providers/Microsoft.OperationalInsights/workspaces/{WorkspaceName}?api-version=2025-07-01
Authorization: Bearer {AccessToken}
Content-Type: application/json

{
  "properties": {
    "workspaceCapping": {
      "dailyQuotaGb": <DailyCapInGb>
    }
  }
}
Note
Currently, Azure doesn't provide a way to set the daily cap for Application Insights with a Bicep template.
Log Analytics:
The following Bicep example uses the Microsoft.OperationalInsights workspaces resource type.
param workspaceName string = '<WorkspaceName>'
param azureRegion string = '<AzureRegion>'
param dailyCapInGb int

resource logAnalyticsWorkspace 'Microsoft.OperationalInsights/workspaces@2025-07-01' = {
  name: workspaceName
  ___location: azureRegion
  properties: {
    workspaceCapping: {
      dailyQuotaGb: dailyCapInGb
    }
  }
}
Note
Currently, Azure doesn't provide a way to set the daily cap for Application Insights using an ARM template.
Log Analytics:
The following ARM (JSON) example uses the Microsoft.OperationalInsights workspaces resource type.
{
  "$schema": "https://schema.management.azure.com/schemas/2019-04-01/deploymentTemplate.json#",
  "contentVersion": "1.0.0.0",
  "parameters": {
    "workspaceName": {
      "type": "string",
      "defaultValue": "<WorkspaceName>"
    },
    "azureRegion": {
      "type": "string",
      "defaultValue": "<AzureRegion>"
    },
    "dailyCapInGb": {
      "type": "int"
    }
  },
  "resources": [
    {
      "type": "Microsoft.OperationalInsights/workspaces",
      "apiVersion": "2025-07-01",
      "name": "[parameters('workspaceName')]",
      "___location": "[parameters('azureRegion')]",
      "properties": {
        "workspaceCapping": {
          "dailyQuotaGb": "[parameters('dailyCapInGb')]"
        }
      }
    }
  ]
}
Set the pricing plan
The pricing plan for Application Insights resources can be set in the associated Log Analytics workspace. For more information about available pricing plans, see Azure Monitor Logs cost calculations and options.
Note
If you're seeing unexpected charges or high costs in Application Insights, this guide can help. It covers common causes like high telemetry volume, data ingestion spikes, and misconfigured sampling. It's especially useful if you're troubleshooting issues related to cost spikes, telemetry volume, sampling not working, data caps, high ingestion, or unexpected billing. To get started, see Troubleshoot high data ingestion in Application Insights.
The following Azure CLI examples use the az monitor log-analytics workspace update command.
Pay-as-you-go:
# Set variables
resourceGroupName="<ResourceGroupName>"
workspaceName="<WorkspaceName>"

# Set the pricing plan to pay-as-you-go
az monitor log-analytics workspace update \
  --resource-group "$resourceGroupName" \
  --workspace-name "$workspaceName" \
  --set PerGB2018
Commitment tier:
# Set variables
resourceGroupName="<ResourceGroupName>"
workspaceName="<WorkspaceName>"
capacityReservationInGb="<CapacityReservationInGb>"

# Set the pricing plan to commitment tier
az monitor log-analytics workspace update \
  --resource-group "$resourceGroupName" \
  --workspace-name "$workspaceName" \
  --set CapacityReservation \
  --level "$capacityReservationInGb"
The following Azure PowerShell examples use the Set-AzOperationalInsightsWorkspace cmdlet.
Pay-as-you-go:
# Set variables
$resourceGroupName = "<ResourceGroupName>"
$workspaceName = "<WorkspaceName>"

# Define the parameters for the pricing plan
$setAzOperationalInsightsWorkspaceParams = @{
    ResourceGroupName = $resourceGroupName
    Name              = $workspaceName
    Sku               = "PerGB2018"
}

# Set the pricing plan to pay-as-you-go
Set-AzOperationalInsightsWorkspace @setAzOperationalInsightsWorkspaceParams
Commitment tier:
# Set variables
$resourceGroupName = "<ResourceGroupName>"
$workspaceName = "<WorkspaceName>"
$capacityReservationInGb = "<CapacityReservationInGb>"

# Define the parameters for the pricing plan
$setAzOperationalInsightsWorkspaceParams = @{
    ResourceGroupName = $resourceGroupName
    Name              = $workspaceName
    Sku               = "CapacityReservation"
    SkuCapacity       = $capacityReservationInGb
}

# Set the pricing plan to commitment tier
Set-AzOperationalInsightsWorkspace @setAzOperationalInsightsWorkspaceParams
The following REST examples use the Pricing Plan - Update REST API operation.
Pay-as-you-go:
PUT https://management.azure.com/subscriptions/{SubscriptionId}/resourceGroups/{ResourceGroupName}/providers/Microsoft.OperationalInsights/workspaces/{WorkspaceName}/pricingPlans/current?api-version=2017-10-01
Authorization: Bearer {AccessToken}
Content-Type: application/json

{
  "properties": {
    "sku": {
      "name": "pergb2018"
    }
  }
}
Commitment tier:
PUT https://management.azure.com/subscriptions/{SubscriptionId}/resourceGroups/{ResourceGroupName}/providers/Microsoft.OperationalInsights/workspaces/{WorkspaceName}/pricingPlans/current?api-version=2017-10-01
Authorization: Bearer {AccessToken}
Content-Type: application/json

{
  "properties": {
    "sku": {
      "name": "capacityreservation",
      "capacityReservationLevel": <CapacityReservationInGb>
    }
  }
}
The following Bicep examples use the Microsoft.OperationalInsights workspaces resource type.
Pay-as-you-go:
param workspaceName string = '<WorkspaceName>'
param azureRegion string = '<AzureRegion>'

resource logAnalyticsWorkspace 'Microsoft.OperationalInsights/workspaces@2025-07-01' = {
  name: workspaceName
  ___location: azureRegion
  properties: {
    sku: {
      name: 'pergb2018'
    }
  }
}
Commitment tier:
param workspaceName string = '<WorkspaceName>'
param azureRegion string = '<AzureRegion>'
param capacityReservationInGb int

resource logAnalyticsWorkspace 'Microsoft.OperationalInsights/workspaces@2025-07-01' = {
  name: workspaceName
  ___location: azureRegion
  properties: {
    sku: {
      name: 'capacityreservation'
      capacityReservationLevel: capacityReservationInGb
    }
  }
}
The following ARM (JSON) examples use the Microsoft.OperationalInsights workspaces resource type.
Pay-as-you-go:
{
  "$schema": "https://schema.management.azure.com/schemas/2019-04-01/deploymentTemplate.json#",
  "contentVersion": "1.0.0.0",
  "parameters": {
    "workspaceName": {
      "type": "string",
      "defaultValue": "<WorkspaceName>"
    },
    "azureRegion": {
      "type": "string",
      "defaultValue": "<AzureRegion>"
    }
  },
  "resources": [
    {
      "type": "Microsoft.OperationalInsights/workspaces",
      "apiVersion": "2025-07-01",
      "name": "[parameters('workspaceName')]",
      "___location": "[parameters('azureRegion')]",
      "properties": {
        "sku": {
          "name": "pergb2018"
        }
      }
    }
  ]
}
Commitment tier:
{
  "$schema": "https://schema.management.azure.com/schemas/2019-04-01/deploymentTemplate.json#",
  "contentVersion": "1.0.0.0",
  "parameters": {
    "workspaceName": {
      "type": "string",
      "defaultValue": "<WorkspaceName>"
    },
    "azureRegion": {
      "type": "string",
      "defaultValue": "<AzureRegion>"
    },
    "capacityReservationInGb": {
      "type": "int"
    }
  },
  "resources": [
    {
      "type": "Microsoft.OperationalInsights/workspaces",
      "apiVersion": "2025-07-01",
      "name": "[parameters('workspaceName')]",
      "___location": "[parameters('azureRegion')]",
      "properties": {
        "sku": {
          "name": "capacityreservation",
          "capacityReservationLevel": "[parameters('capacityReservationInGb')]"
        }
      }
    }
  ]
}
Disable IP masking
By default, Application Insights doesn't store IP addresses. To learn how to disable IP masking, see Geolocation and IP address handling.
Create additional resources
Create an availability test
The following Azure CLI example uses the az monitor app-insights web-test create command. It creates a standard availability test with default settings.
# Set variables
resourceGroupName="<ResourceGroupName>"
resourceName="<ResourceName>"
azureRegion="<AzureRegion>"
webTestName="<WebTestName>"
requestUrl="<RequestUrl>"

# Get the subscription ID from the current Azure CLI context
subscriptionId=$(az account show --query id --output tsv)

# Create a standard availability test
az monitor app-insights web-test create \
  --resource-group "$resourceGroupName" \
  --___location "$azureRegion" \
  --web-test-kind standard \
  --name "$webTestName" \
  --defined-web-test-name "$webTestName" \
  --request-url "$requestUrl" \
  --retry-enabled true \
  --ssl-check true \
  --ssl-lifetime-check 7 \
  --frequency 300 \
  --locations Id="us-ca-sjc-azr" \
  --locations Id="apac-sg-sin-azr" \
  --locations Id="us-il-ch1-azr" \
  --locations Id="us-va-ash-azr" \
  --locations Id="emea-au-syd-edge" \
  --http-verb GET \
  --timeout 120 \
  --expected-status-code 200 \
  --enabled true \
  --tags "hidden-link:/subscriptions/$subscriptionId/resourceGroups/$resourceGroupName/providers/microsoft.insights/components/$resourceName=Resource"
Note
The web test region (--___location) is different from the geographic ___location (--locations, notice the plural form) of which multiple can be selected. --___location refers to the Azure region where the web test is created and hosted, while --locations refers to the geographic ___location or locations from which the web test is executed. For a full list of all geographic locations, see Application Insights availability tests.
The following Azure PowerShell example uses the New-AzApplicationInsightsWebTest cmdlet. It creates a standard availability test with default settings.
# Set variables
$resourceGroupName = "<ResourceGroupName>"
$resourceName = "<ResourceName>"
$azureRegion = "<AzureRegion>"
$webTestName = "<WebTestName>"
$requestUrl = "<RequestUrl>"

# Get the subscription ID from the current Azure PowerShell context
$subscriptionId = (Get-AzContext).Subscription.Id

# Define the geographic locations from which the web test is executed
$geoLocation = @()
$geoLocation += New-AzApplicationInsightsWebTestGeolocationObject -Location "us-ca-sjc-azr"
$geoLocation += New-AzApplicationInsightsWebTestGeolocationObject -Location "apac-sg-sin-azr"
$geoLocation += New-AzApplicationInsightsWebTestGeolocationObject -Location "us-il-ch1-azr"
$geoLocation += New-AzApplicationInsightsWebTestGeolocationObject -Location "us-va-ash-azr"
$geoLocation += New-AzApplicationInsightsWebTestGeolocationObject -Location "emea-au-syd-edge"

# Define parameters for New-AzApplicationInsightsWebTest
$newAzApplicationInsightsWebTestParams = @{
    ResourceGroupName              = $resourceGroupName
    Location                       = $azureRegion
    Name                           = $webTestName
    TestName                       = $webTestName
    Kind                           = "standard"
    RequestUrl                     = $requestUrl
    RetryEnabled                   = $true
    RuleSslCheck                   = $true
    RuleSslCertRemainingLifetimeCheck = 7
    Frequency                      = 300
    GeoLocation                    = $geoLocation
    RequestHttpVerb                = "GET"
    Timeout                        = 120
    RuleExpectedHttpStatusCode     = 200
    Enabled                        = $true
    Tag                            = @{
        "hidden-link:/subscriptions/$subscriptionId/resourceGroups/$resourceGroupName/providers/microsoft.insights/components/$resourceName" = "Resource"
    }
}

# Create a standard availability test
New-AzApplicationInsightsWebTest @newAzApplicationInsightsWebTestParams
Note
The web test region (-Location) is different from the geographic ___location (-GeoLocation) of which multiple can be selected. -Location refers to the Azure region where the web test is created and hosted, while -GeoLocation refers to the geographic ___location or locations from which the web test is executed. For a full list of all geographic locations, see Application Insights availability tests.
The following REST example uses the Web Tests - Create Or Update REST API operation. It creates a standard availability test with default settings.
PUT https://management.azure.com/subscriptions/{SubscriptionId}/resourceGroups/{ResourceGroupName}/providers/Microsoft.Insights/webtests/{WebTestName}?api-version=2022-06-15
Authorization: Bearer {AccessToken}
Content-Type: application/json

{
  "___location": "<AzureRegion>",
  "tags": {
    "hidden-link:/subscriptions/<SubscriptionId>/resourceGroups/<ResourceGroupName>/providers/microsoft.insights/components/<ResourceName>": "Resource"
  },
  "properties": {
    "Name": "<WebTestName>",
    "SyntheticMonitorId": "<WebTestName>",
    "Enabled": true,
    "Frequency": 300,
    "Timeout": 120,
    "Kind": "standard",
    "RetryEnabled": true,
    "Request": {
      "RequestUrl": "<RequestUrl>",
      "HttpVerb": "GET"
    },
    "ValidationRules": {
      "ExpectedHttpStatusCode": 200,
      "SSLCheck": true,
      "SSLCertRemainingLifetimeCheck": 7
    },
    "Locations": [
      { "Id": "us-ca-sjc-azr" },
      { "Id": "apac-sg-sin-azr" },
      { "Id": "us-il-ch1-azr" },
      { "Id": "us-va-ash-azr" },
      { "Id": "emea-au-syd-edge" }
    ]
  }
}
Note
The web test region (___location) is different from the geographic ___location (Locations, notice the plural form) of which multiple can be selected. ___location refers to the Azure region where the web test is created and hosted, while Locations refers to the geographic ___location or locations from which the web test is executed. For a full list of all geographic locations, see Application Insights availability tests.
The following Bicep example uses the Microsoft.Insights webtests resource type. It creates a standard availability test with default settings.
param subscriptionId string = '<SubscriptionId>'
param resourceGroupName string = '<ResourceGroupName>'
param resourceName string = '<ResourceName>'
param azureRegion string = '<AzureRegion>'
param webTestName string = '<WebTestName>'
param requestUrl string = '<RequestUrl>'

resource webTest 'Microsoft.Insights/webtests@2022-06-15' = {
  name: webTestName
  ___location: azureRegion
  tags: {
    'hidden-link:/subscriptions/${subscriptionId}/resourceGroups/${resourceGroupName}/providers/microsoft.insights/components/${resourceName}': 'Resource'
  }
  properties: {
    SyntheticMonitorId: webTestName
    Name: webTestName
    Enabled: true
    Frequency: 300
    Timeout: 120
    Kind: 'standard'
    RetryEnabled: true
    Locations: [
      { Id: 'us-ca-sjc-azr' }
      { Id: 'apac-sg-sin-azr' }
      { Id: 'us-il-ch1-azr' }
      { Id: 'us-va-ash-azr' }
      { Id: 'emea-au-syd-edge' }
    ]
    Request: {
      RequestUrl: requestUrl
      HttpVerb: 'GET'
    }
    ValidationRules: {
      ExpectedHttpStatusCode: 200
      SSLCheck: true
      SSLCertRemainingLifetimeCheck: 7
    }
  }
}
Note
The web test region (___location) is different from the geographic ___location (Locations) of which multiple can be selected. ___location refers to the Azure region where the web test is created and hosted, while Locations refers to the geographic ___location or locations from which the web test is executed. For a full list of all geographic locations, see Application Insights availability tests.
For more information about creating availability tests using Bicep, see Microsoft.Insights webtests.
The following ARM (JSON) example uses the Microsoft.Insights webtests resource type. It creates a standard availability test with default settings.
{
  "$schema": "https://schema.management.azure.com/schemas/2019-04-01/deploymentTemplate.json#",
  "contentVersion": "1.0.0.0",
  "parameters": {
    "subscriptionId": {
      "type": "string",
      "defaultValue": "<SubscriptionId>"
    },
    "resourceGroupName": {
      "type": "string",
      "defaultValue": "<ResourceGroupName>"
    },
    "resourceName": {
      "type": "string",
      "defaultValue": "<ResourceName>"
    },
    "azureRegion": {
      "type": "string",
      "defaultValue": "<AzureRegion>"
    },
    "webTestName": {
      "type": "string",
      "defaultValue": "<WebTestName>"
    },
    "requestUrl": {
      "type": "string",
      "defaultValue": "<RequestUrl>"
    }
  },
  "resources": [
    {
      "type": "Microsoft.Insights/webtests",
      "apiVersion": "2022-06-15",
      "name": "[parameters('webTestName')]",
      "___location": "[parameters('azureRegion')]",
      "tags": {
        "[format('hidden-link:/subscriptions/{0}/resourceGroups/{1}/providers/microsoft.insights/components/{2}', parameters('subscriptionId'), parameters('resourceGroupName'), parameters('resourceName'))]": "Resource"
      },
      "properties": {
        "SyntheticMonitorId": "[parameters('webTestName')]",
        "Name": "[parameters('webTestName')]",
        "Enabled": true,
        "Frequency": 300,
        "Timeout": 120,
        "Kind": "standard",
        "RetryEnabled": true,
        "Locations": [
          { "Id": "us-ca-sjc-azr" },
          { "Id": "apac-sg-sin-azr" },
          { "Id": "us-il-ch1-azr" },
          { "Id": "us-va-ash-azr" },
          { "Id": "emea-au-syd-edge" }
        ],
        "Request": {
          "RequestUrl": "[parameters('requestUrl')]",
          "HttpVerb": "GET"
        },
        "ValidationRules": {
          "ExpectedHttpStatusCode": 200,
          "SSLCheck": true,
          "SSLCertRemainingLifetimeCheck": 7
        }
      }
    }
  ]
}
Note
The web test region (___location) is different from the geographic ___location (Locations) of which multiple can be selected. ___location refers to the Azure region where the web test is created and hosted, while Locations refers to the geographic ___location or locations from which the web test is executed. For a full list of all geographic locations, see Application Insights availability tests.
Add a metric alert
Tip
Each Application Insights resource comes with metrics that are available out of the box. If separate components report to the same Application Insights resource, it might not make sense to alert on these metrics.
To automate the creation of metric alerts, see the Metric alerts template article.
Create more Application Insights resources
How many Application Insights resources should I deploy?
When you're developing the next version of a web application, you don't want to mix up the Application Insights telemetry from the new version and the already released version.
To avoid confusion, send the telemetry from different development stages to separate Application Insights resources with separate connection strings.
If your system is an instance of Azure Cloud Services, there's another method of setting separate connection strings.
When to use a single Application Insights resource
Use a single Application Insights resource for:
- Streamlining DevOps/ITOps management for applications deployed together, typically developed and managed by the same team.
- Centralizing key performance indicators, such as response times and failure rates, in a dashboard by default. Segment by role name in the metrics explorer if necessary.
- When there's no need for different Azure role-based access control management between application components.
- When identical metrics alert criteria, continuous exports, and billing/quotas management across components suffice.
- When it's acceptable for an API key to access data from all components equally, and 10 API keys meet the needs across all components.
- When the same smart detection and work item integration settings are suitable across all roles.
Note
If you want to consolidate multiple Application Insights resources, you can point your existing application components to a new, consolidated Application Insights resource. The telemetry stored in your old resource doesn't transfer to the new resource. Only delete the old resource when you have enough telemetry in the new resource for business continuity.
Other considerations
To activate portal experiences, add custom code to assign meaningful values to the Cloud_RoleName attribute. Without these values, portal features don't function.
For Azure Service Fabric applications and classic cloud services, the SDK automatically configures services by reading from the Azure Role Environment. For other app types, you typically need to set it explicitly.
Live Metrics can't split data by role name.
Version and release tracking
When you publish a new version of your application, you want to be able to separate the telemetry from different builds. You can set the Application Version property so you can filter search and metric explorer results.
There are several different methods of setting the Application Version property.
Option 1: Set the version directly
For OpenTelemetry-based instrumentation, set application metadata consistently by using resource attributes.
Option 2: Set the version in BuildInfo.config (ASP.NET only)
The Application Insights web module picks up the version from the BuildLabel node. Include this file in your project and remember to set the Copy Always property in Solution Explorer.
<?xml version="1.0" encoding="utf-8"?>
<DeploymentEvent xmlns:xsi="https://www.w3.org/2001/XMLSchema-instance" xmlns:xsd="https://www.w3.org/2001/XMLSchema" xmlns="http://schemas.microsoft.com/VisualStudio/DeploymentEvent/2013/06">
  <ProjectName>AppVersionExpt</ProjectName>
  <Build type="MSBuild">
    <MSBuild>
      <BuildLabel kind="label">1.0.0.2</BuildLabel>
    </MSBuild>
  </Build>
</DeploymentEvent>
Generate BuildInfo.config automatically in the Microsoft Build Engine. Add the following lines to your .csproj file:
<PropertyGroup>
  <GenerateBuildInfoConfigFile>true</GenerateBuildInfoConfigFile>
  <IncludeServerNameInBuildInfo>true</IncludeServerNameInBuildInfo>
</PropertyGroup>
This step generates a file called yourProjectName.BuildInfo.config. The Publish process renames it to BuildInfo.config.
The build label contains a placeholder (*AutoGen_...*) when you build with Visual Studio. When built with the Microsoft Build Engine, the placeholder is populated with the correct version number.
To allow the Microsoft Build Engine to generate version numbers, set the version like 1.0.* in AssemblyReference.cs.
Release annotations
If you use Azure DevOps, you can get an annotation marker added to your charts whenever you release a new version.
Automate the resource creation process
The resource creation process can be automated by using Bicep or JSON templates with Azure Resource Manager. You can package several resources together to create them in one deployment. For example, you can create an Application Insights resource with availability tests, metric alerts, and a diagnostic setting to send telemetry to an Azure Storage account.
Generate a template in the Azure portal
You can generate a template from existing resources.
Application Insights only
- Go to the Application Insights resource in the Azure portal.
- Open Export template listed under Automation in the left-hand navigation bar.
- (Optional): To use your own parameters, uncheck Include parameters.
- Download the template file or Deploy it directly in the Azure portal.
Multiple resources
- Go to the resource group of your Application Insights resource.
- On the Overview pane, mark all resources you want to be included in the template, then select Export template in the top navigation bar.
- (Optional): To use your own parameters, uncheck Include parameters.
- Download the template file or Deploy it directly in the Azure portal.
Create a template from scratch
To learn how to create an ARM template from scratch, visit our ARM template documentation which includes tutorials to create a template, add resources, add parameters, and more.
Available properties for Application Insights, availability tests, metric alerts, diagnostic settings, and other resources can be found in our Azure resource reference documentation under the Reference > Monitor > Insights node.
Tip
You can also use quickstart templates, available towards the bottom of each Azure resource reference documentation page linked in this section. To learn how to use templates, visit Tutorial: Use Azure Quickstart Templates.
Next steps

