Note
Access to this page requires authorization. You can try signing in or changing directories.
Access to this page requires authorization. You can try changing directories.
You can automatically deliver proxy settings and certificate authority trust settings in Microsoft Edge by using an Intune mobile application management (MAM) policy. The policy can take advantage of the Explicit Forward Proxy feature of Global Secure Access.
Important
The Explicit Forward Proxy feature is currently in preview. This information relates to a prerelease product that might be substantially modified before release. Microsoft makes no warranties, expressed or implied, with respect to the information provided here.
Prerequisites
- A Microsoft Entra identity with at least the Global Secure Access Administrator Reader role and Intune Administrator role.
- Explicit Forward Proxy configured in the Microsoft Entra admin center.
- A security group in Microsoft Entra ID with users who should receive Explicit Forward Proxy configuration in Microsoft Edge.
- The plain-text public key of the Transport Layer Security (TLS) inspection root certificate that you used when you configured Microsoft Entra Internet Access TLS inspection.
Limitations
- This method to apply a policy works only on Microsoft Edge for Windows.
- If mobile device management (MDM) is configured on the device, and the MDM policy has conflicting Microsoft Edge settings, the MAM policy isn't applied.
Configuration
1. Get the URL of the PAC file
Open the Microsoft Entra admin center.
Go to Global Secure Access > Settings > Session management > Explicit Forward Proxy.
Copy the URL of the proxy automatic configuration (PAC) file. Save it for the Intune app management policy that you configure next.
2. Select Microsoft Edge for the app
Open the Intune admin center.
Under Apps > Manage apps, select Configuration.
Select + Create > Managed Apps.
For Name, enter a name of your choice. For example, enter GSA Explicit Forward Proxy Settings for Edge.
For Target policy to, choose Selected apps.
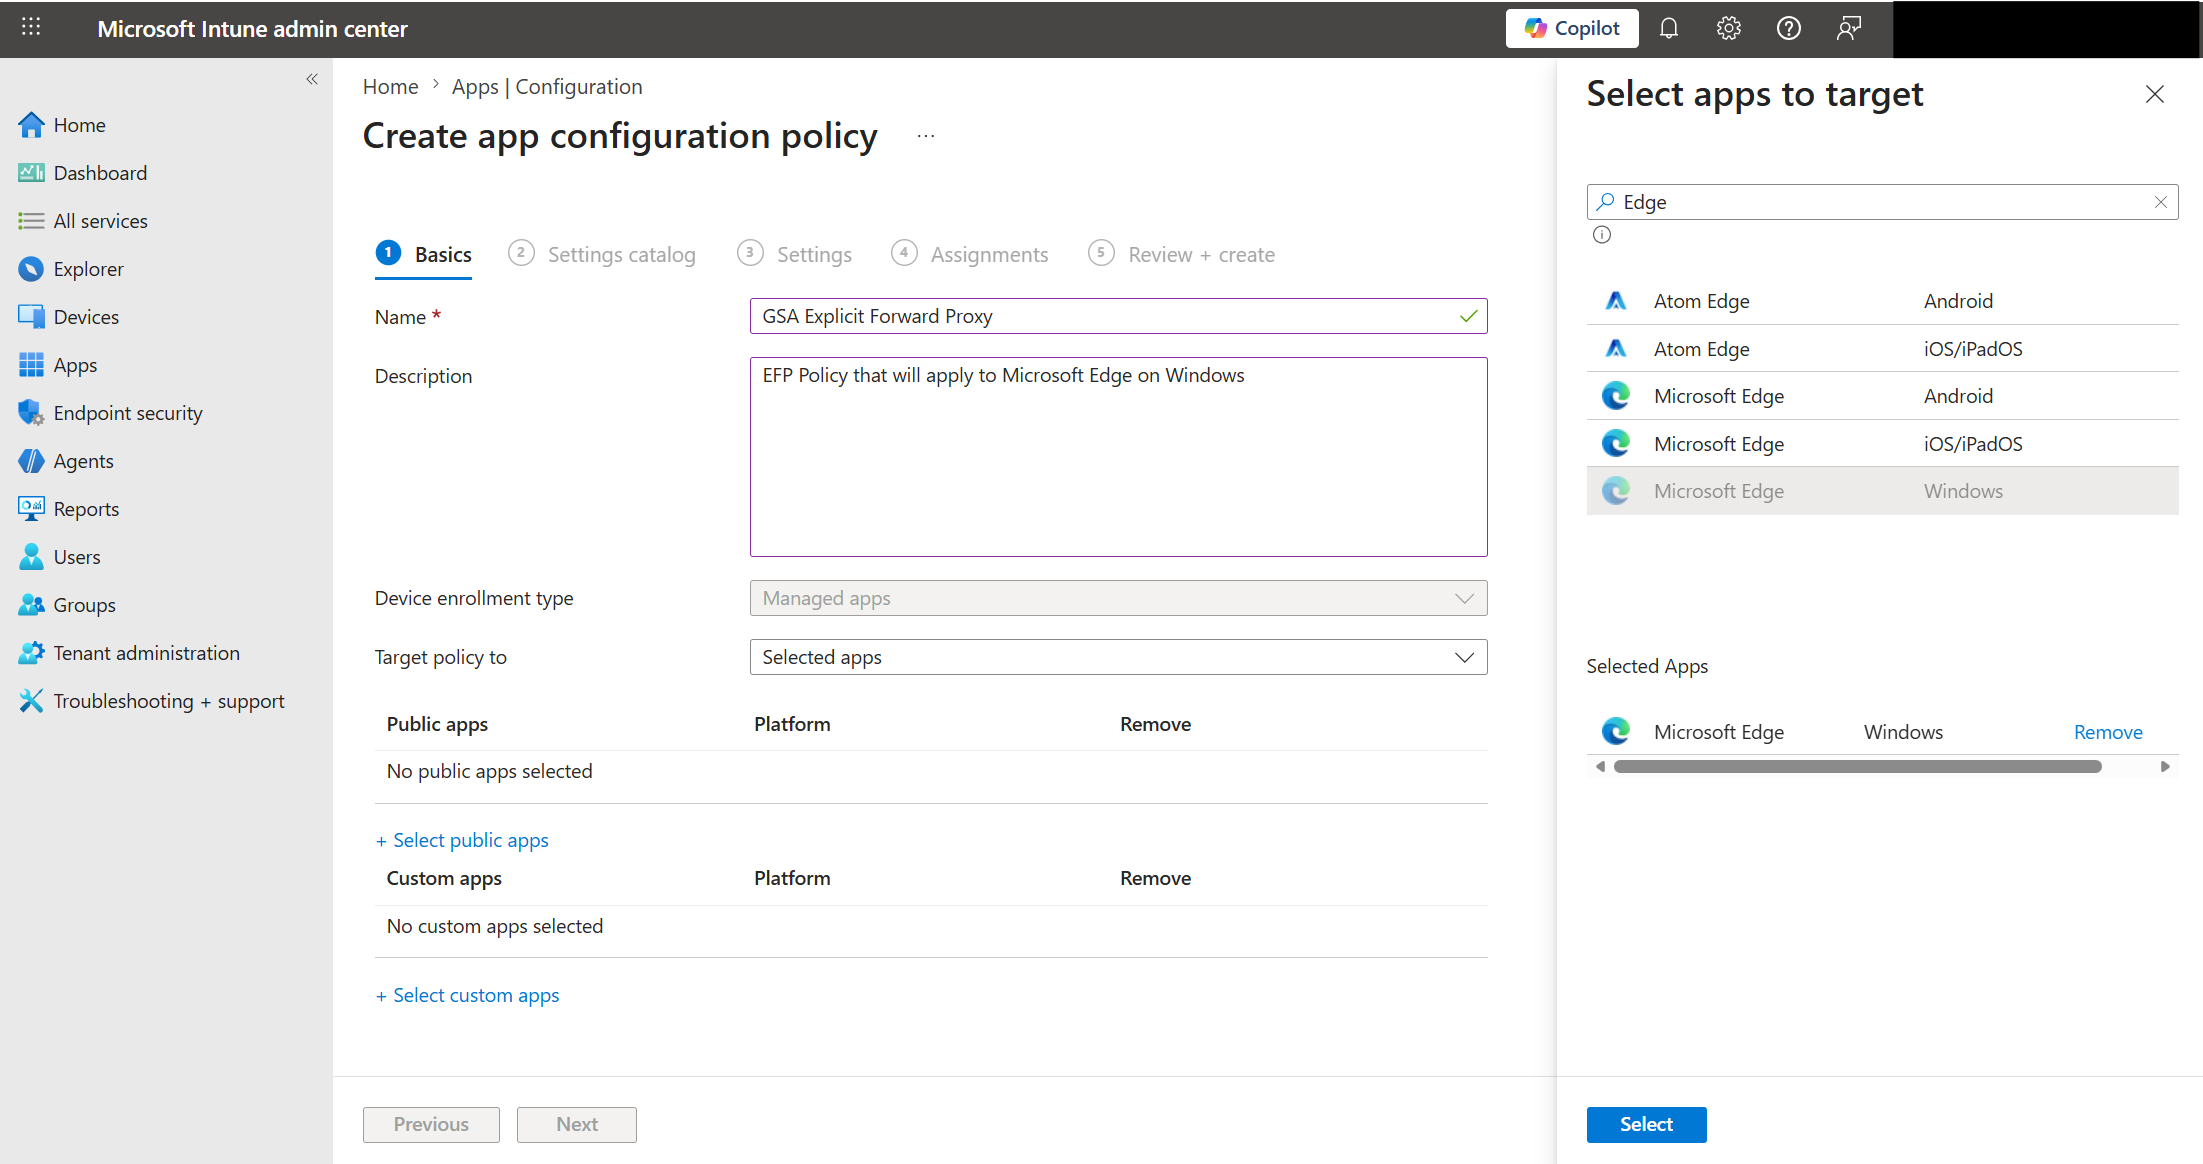
Choose + Select public apps. In the Select apps to target pane:
- Search for Edge.
- Select Microsoft Edge / Windows.
- Choose Select.
Select Next to advance to the Settings catalog tab.
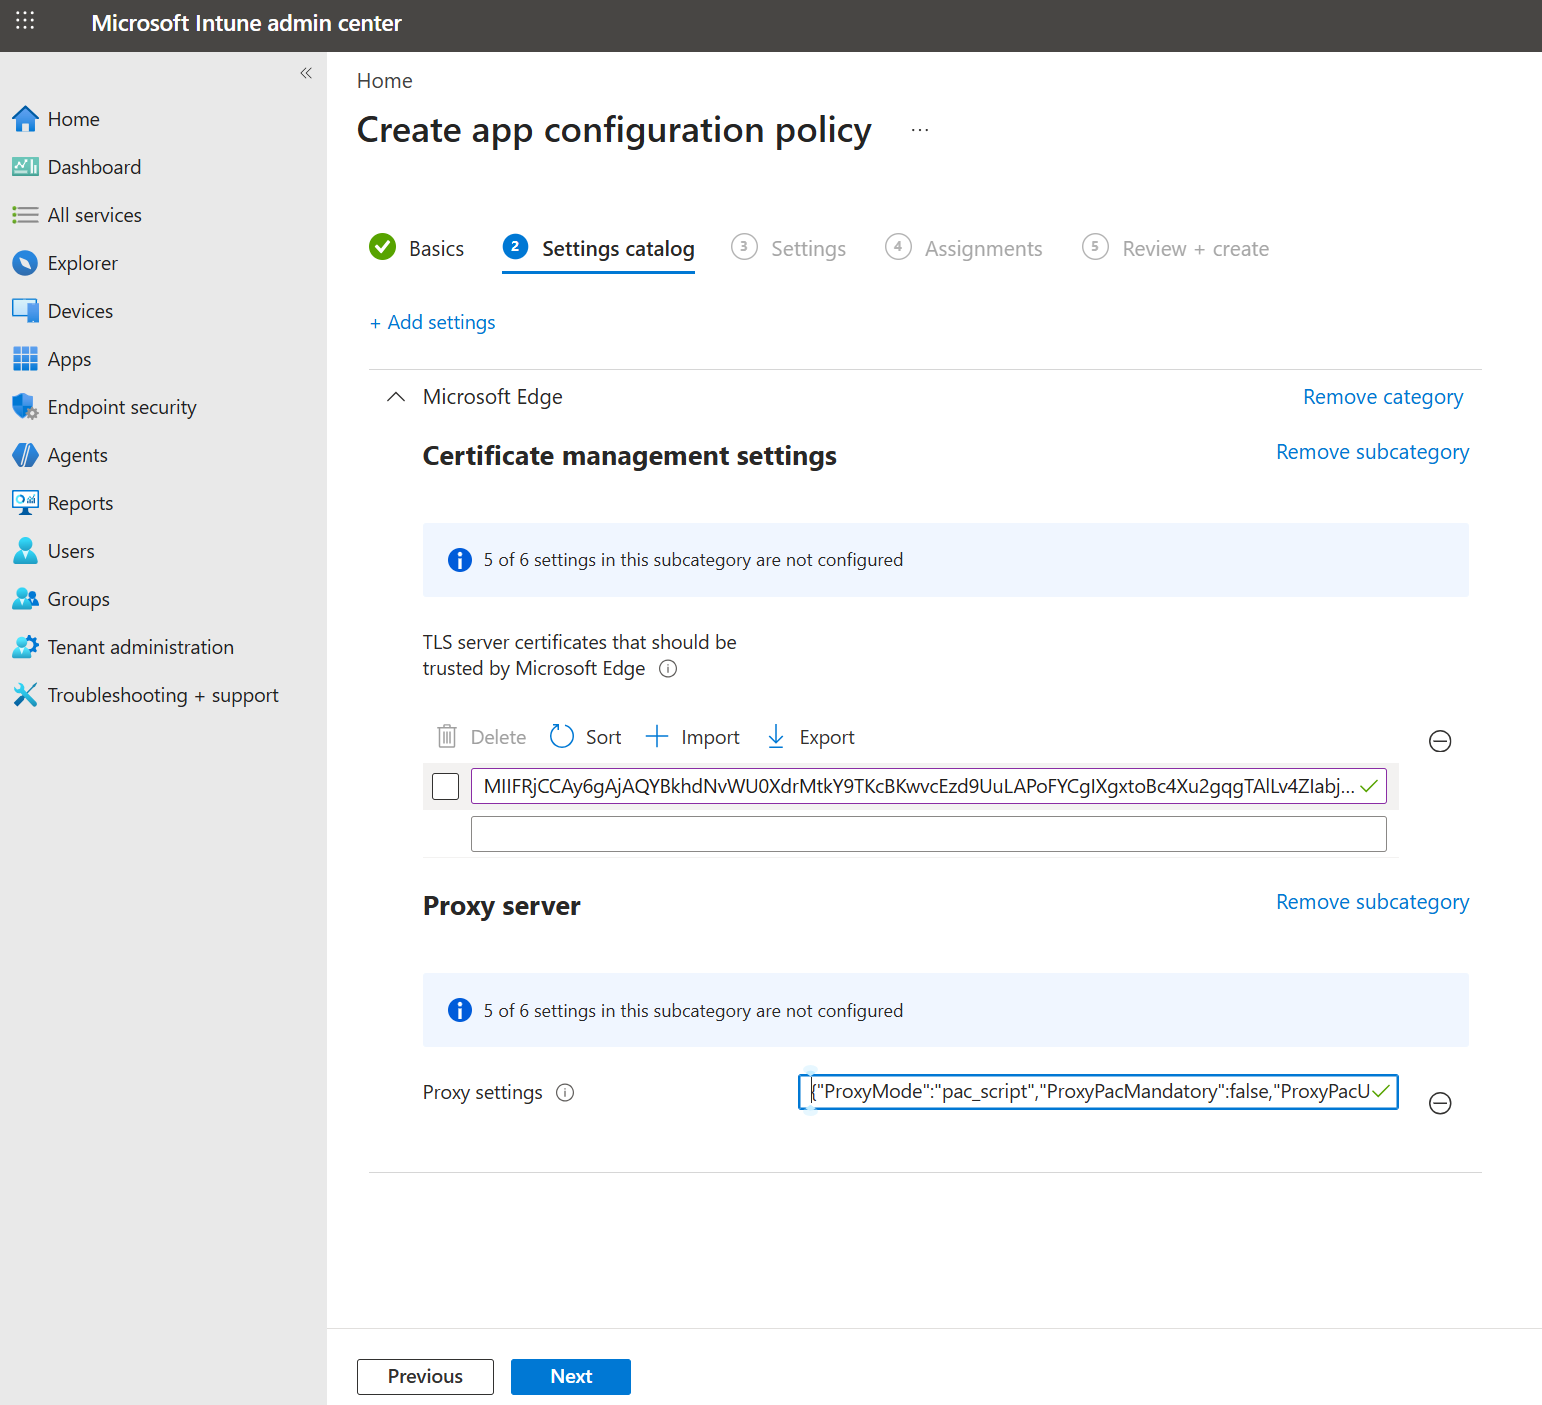
3. Add proxy settings
Select + Add setting. In the Settings picker pane:
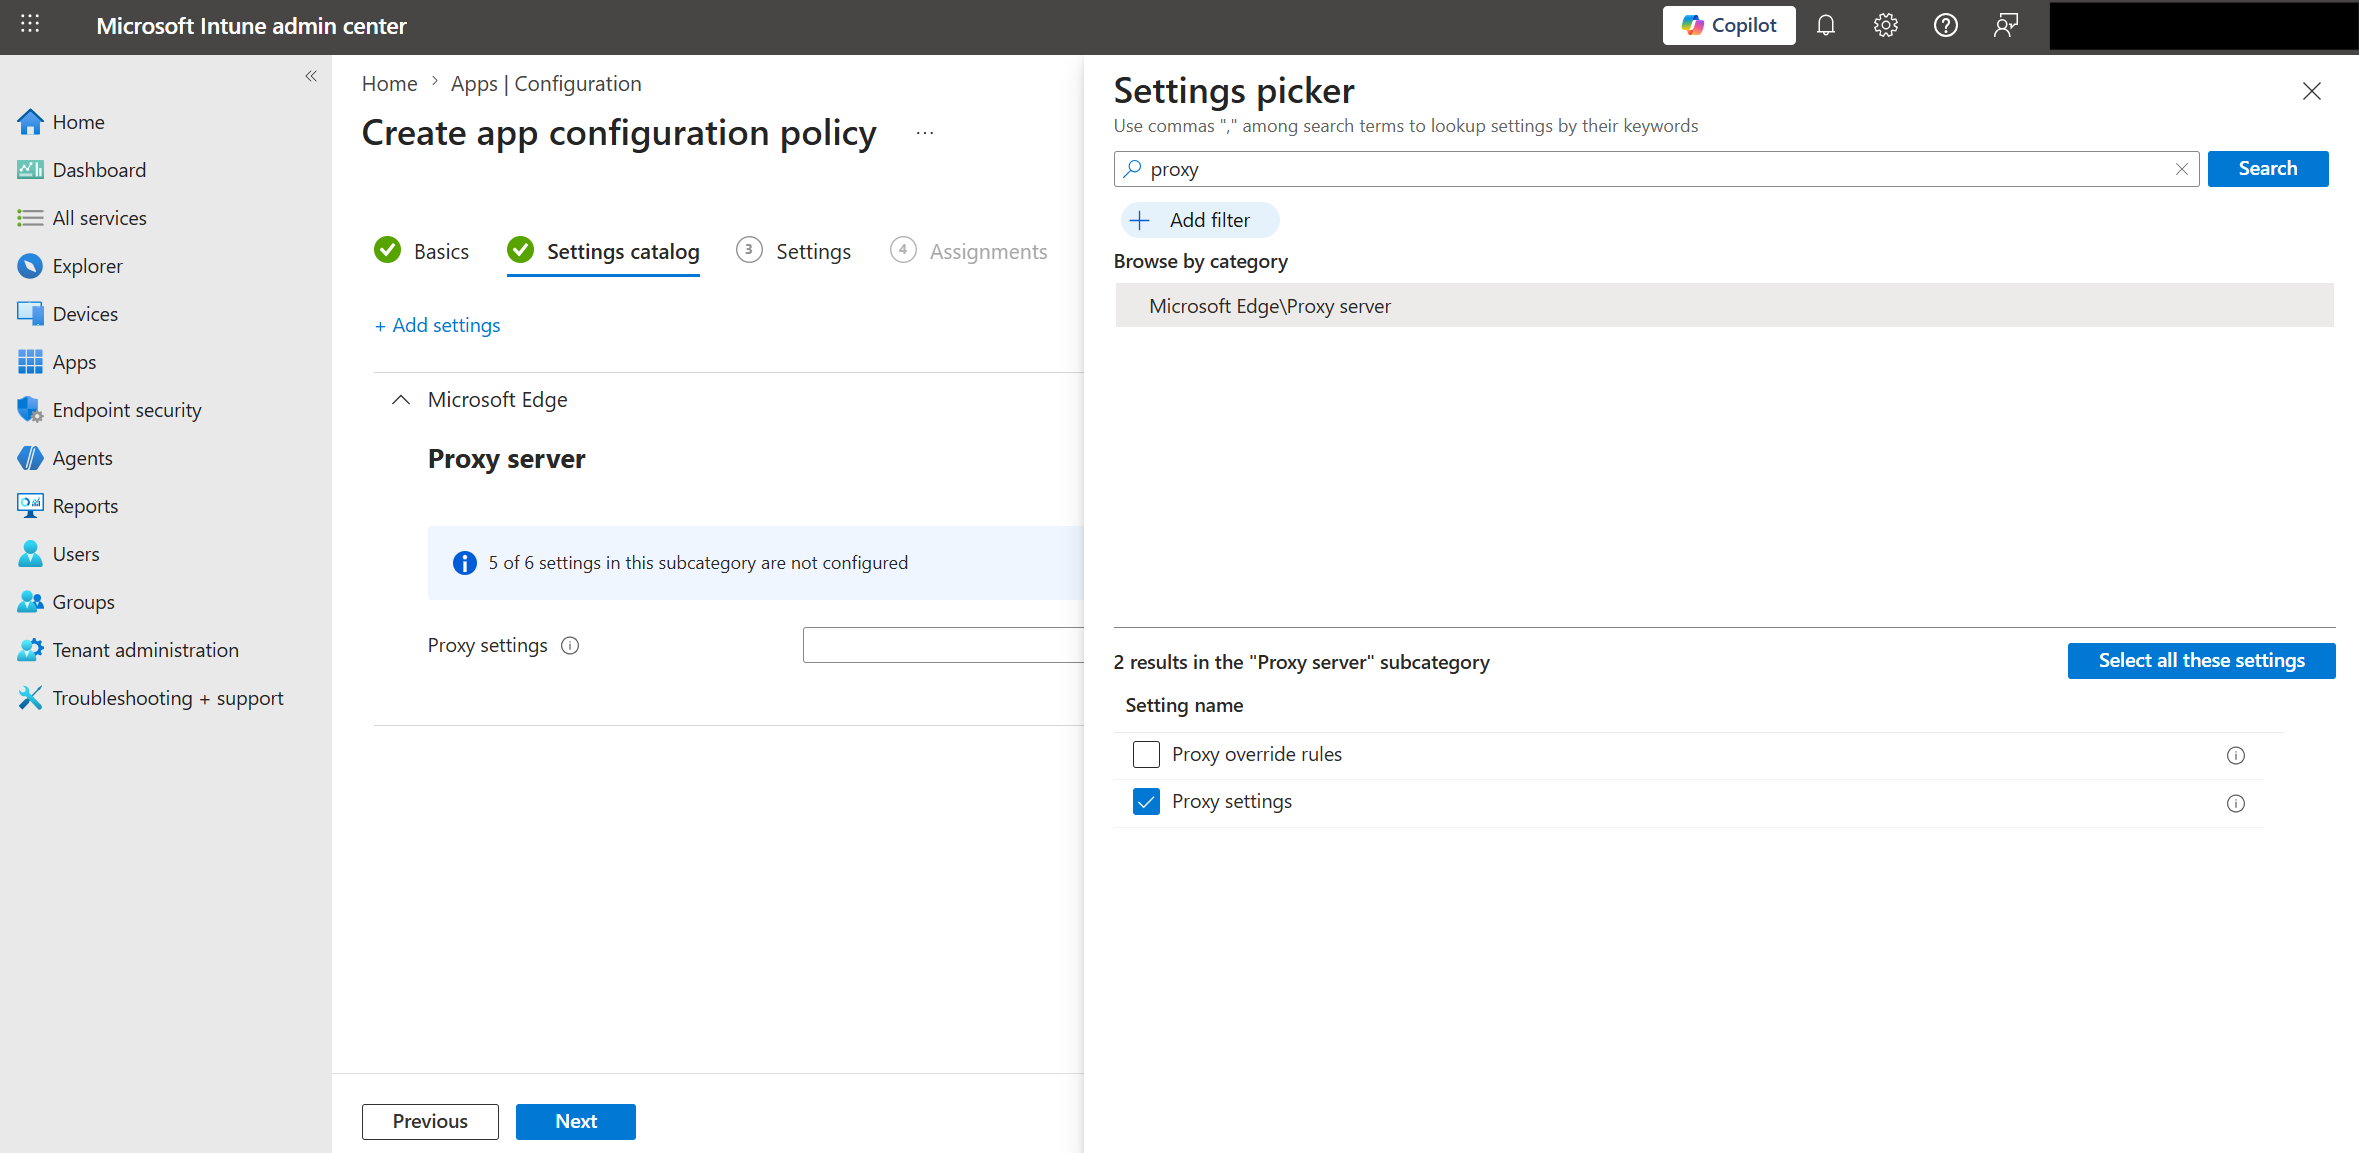
Enter proxy in the search box, and then select Search.
In the results, select Microsoft Edge/Proxy server.
Select the Proxy settings checkbox.
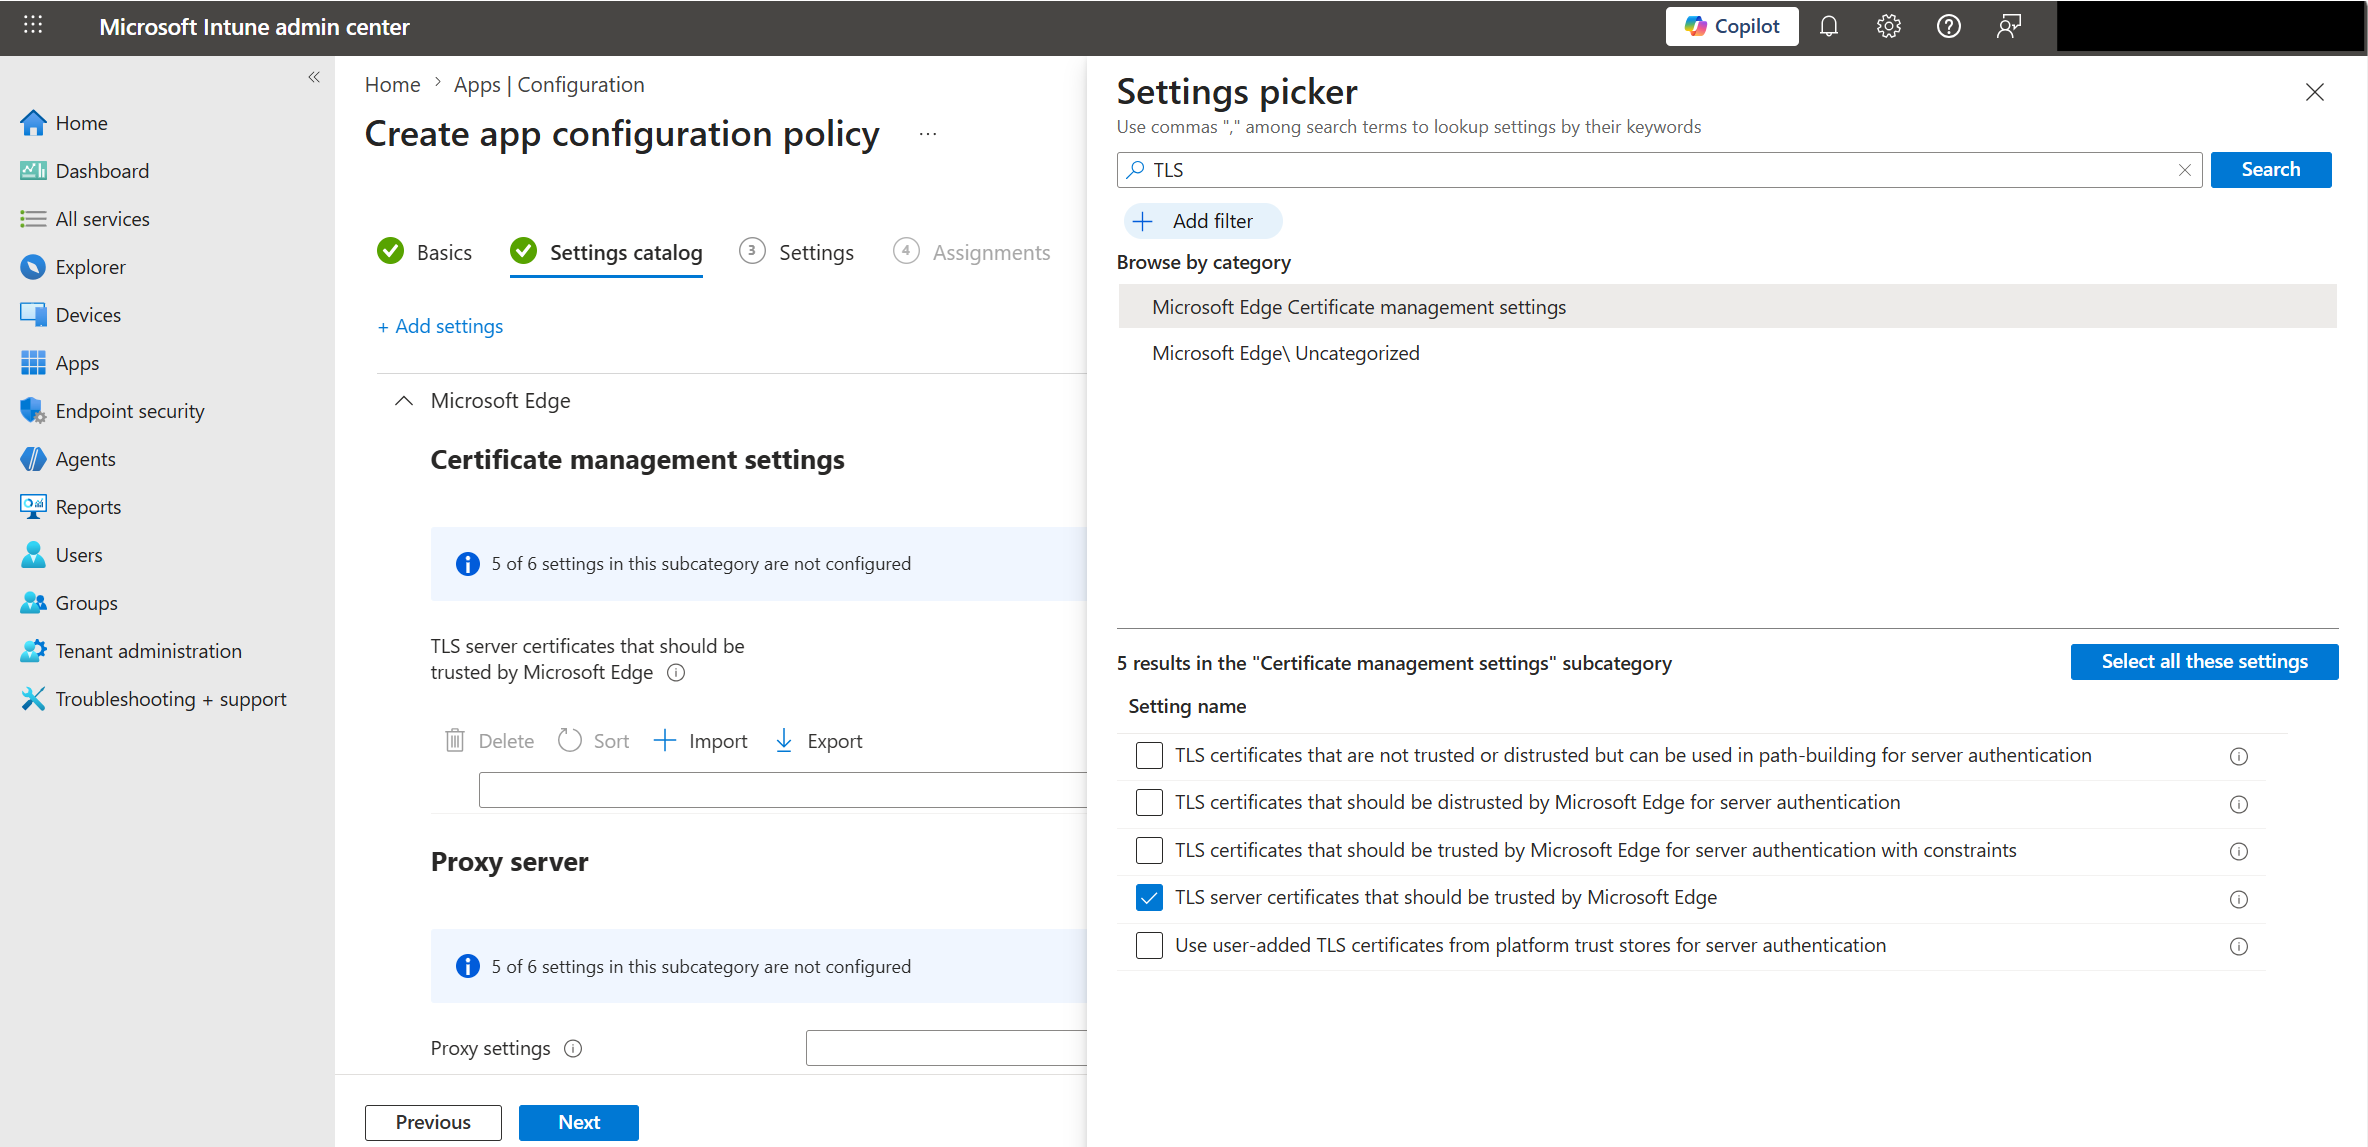
Enter TLS in the search box, and then select Search.
In the search results, select Microsoft Edge Certificate management settings.
Select the TLS server certificates that should be trusted by Microsoft Edge checkbox.
Close the Settings picker pane (X on the upper right).
In the Proxy Server section, configure proxy settings as follows:
{"ProxyMode":"pac_script","ProxyPacMandatory":false,"ProxyPacUrl":"URL_you_copied_from_the_Entra_portal"}
4. Convert the key into a string
Convert the TLS inspection root public key (certificate) to a contiguous plain-text string. You can use either PowerShell or a Linux/macOS terminal.
PowerShell
Change the directory to where the
.pemor.cerplain-text key is stored.Confirm that the key is plain text by running the following command:
if ((Get-Content cert.pem -First 1) -match '-----BEGIN') { 'PEM (plain text)' } else { 'DER (binary)' }If the output is
PEM (plain text), you can continue. Otherwise, convert the binary encoded file to PEM.Convert the PEM certificate string to extract only the key, without the line breaks:
(Get-Content cert.pem | Where-Object { $_ -notmatch '-----' }) -join ''Copy the resulting string from the console output and save it for the next step.
Linux/macOS terminal
Change the directory to where the
.pemor.cerplain-text key is stored.Confirm that the key is plain text by running the following command:
head -c 15 cert.pem | grep -q 'BEGIN' && echo 'PEM (plain text)' || echo 'DER (binary)'If the output is
PEM (plain text), you can continue. Otherwise, convert the binary encoded file to PEM.Extract the key from the file, without the line breaks:
awk '!/-----/{printf "%s",$0}' cert.pem | tr -d '\r'Copy the resulting string from the console output and save it for the next step. Don't copy the trailing
%if it appears in the terminal output.
5. Paste the copied string
In the Certificate management settings section, paste the output of the converted, plain-text string (without line breaks) into the text box.
Note
Don't use the Import button in this section. Import is intended for bulk configuration settings, where you have multiple certificates that need to be trusted. The import function of the Intune portal expects a CSV file with a list of plain-text contiguous keys, not the PEM/CER file.
Your resulting configuration should look similar to the following screenshot. Select Next.
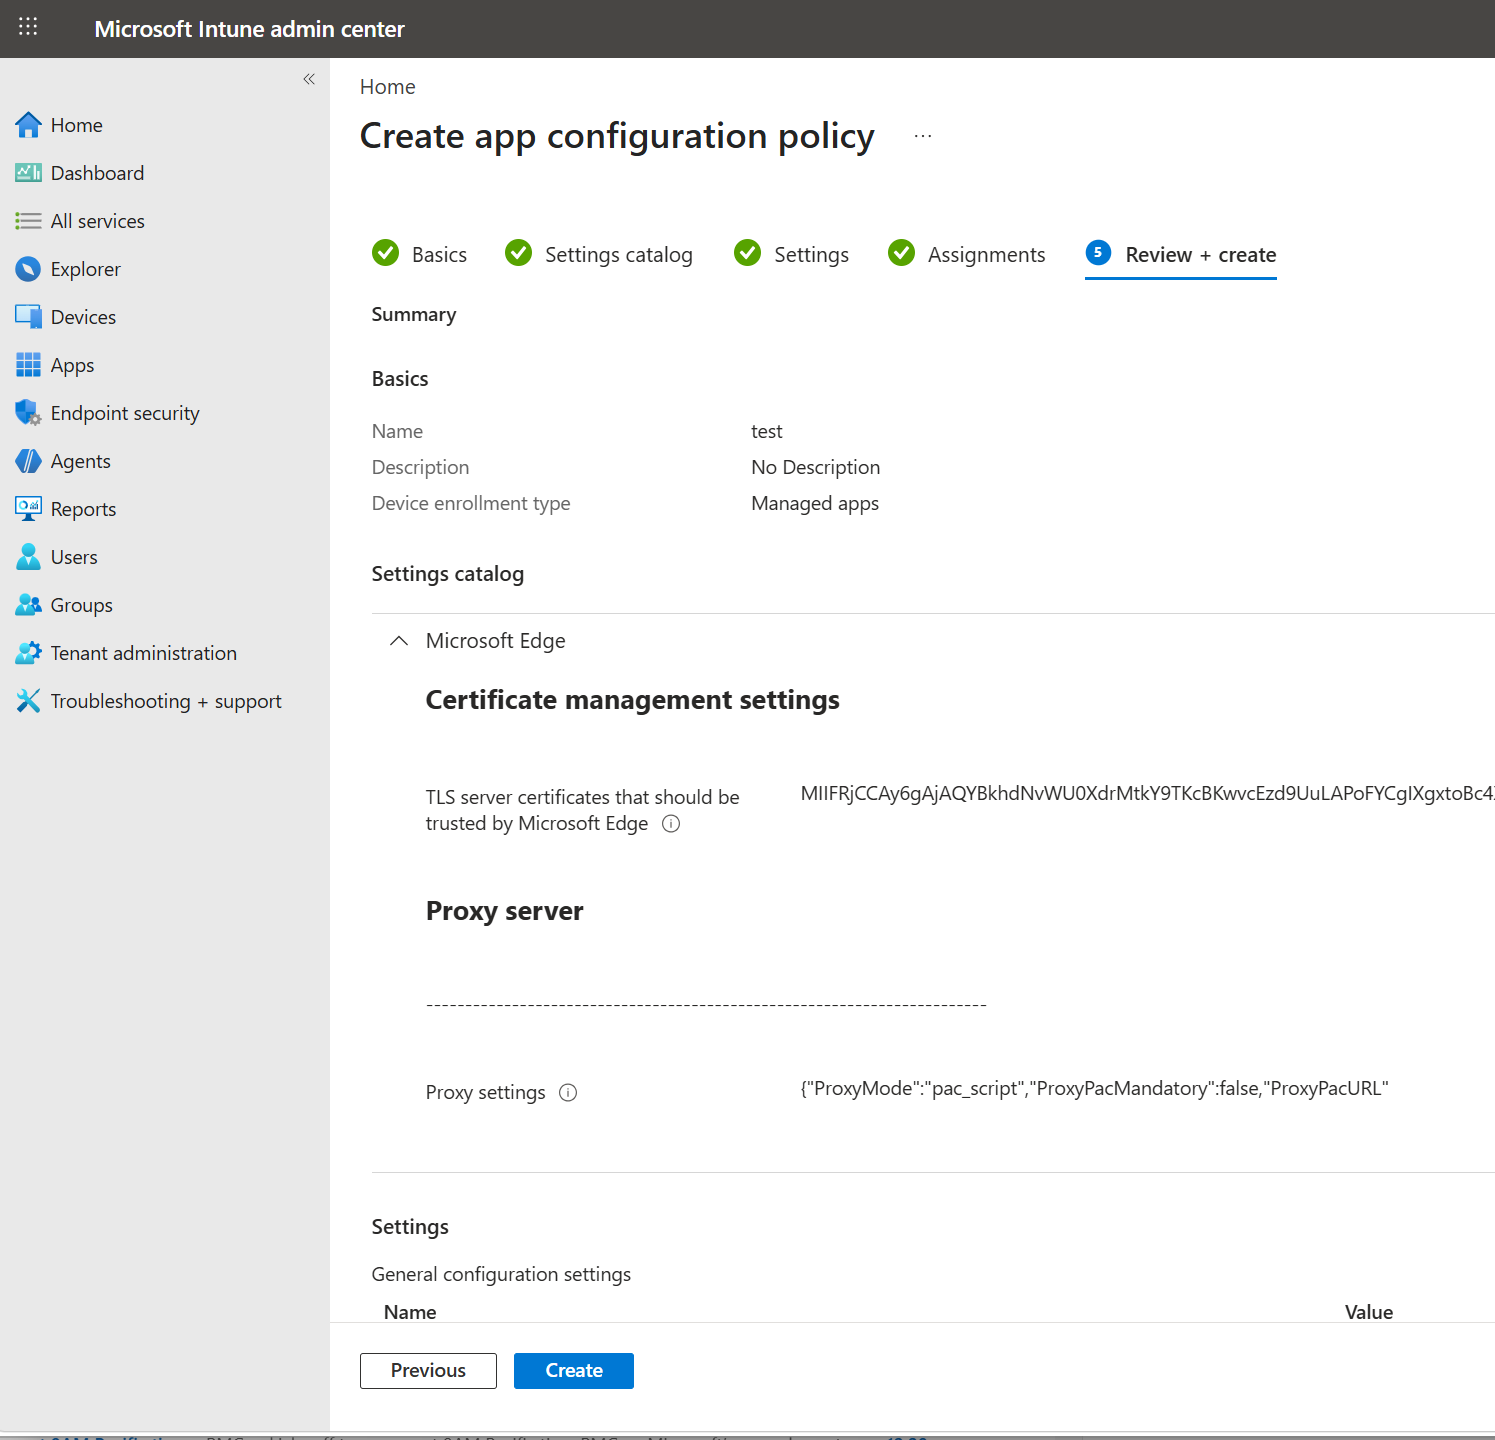
6. Assign the security group and create the policy
On the Settings tab, select Next.
On the Assignments tab:
- Select Add Groups.
- Select the security group in Microsoft Entra ID that contains users of Explicit Forward Proxy.
- Select Next.
Your Review + create tab should look similar to the following screenshot. Select Create.
Validation
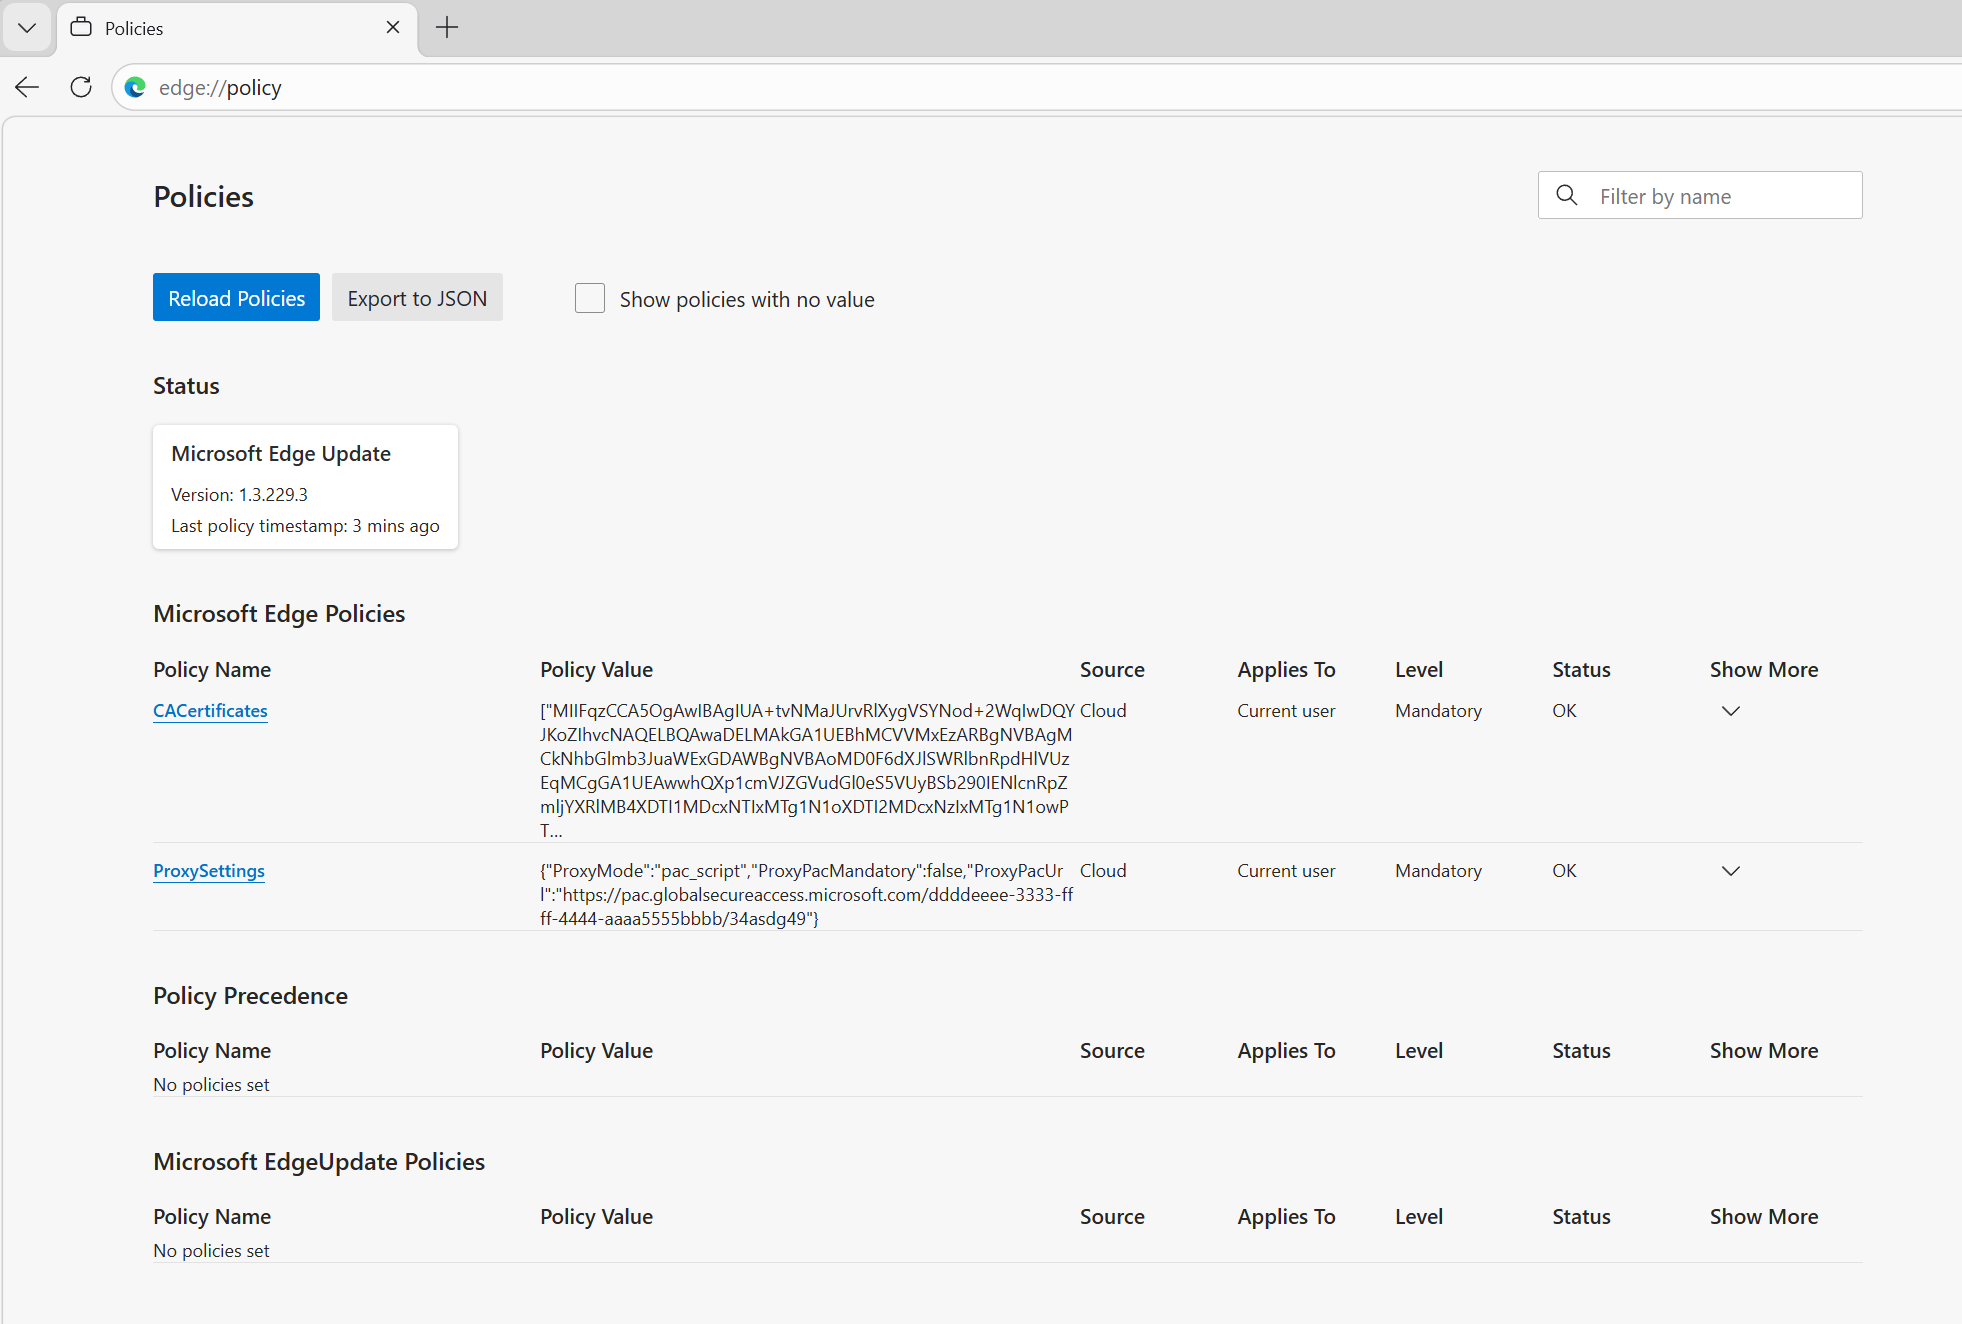
Open Microsoft Edge on a Windows device. Sign in with a work or school account.
Go to
edge://policy. Confirm that the policy settings that you configured for Explicit Forward Proxy appear.